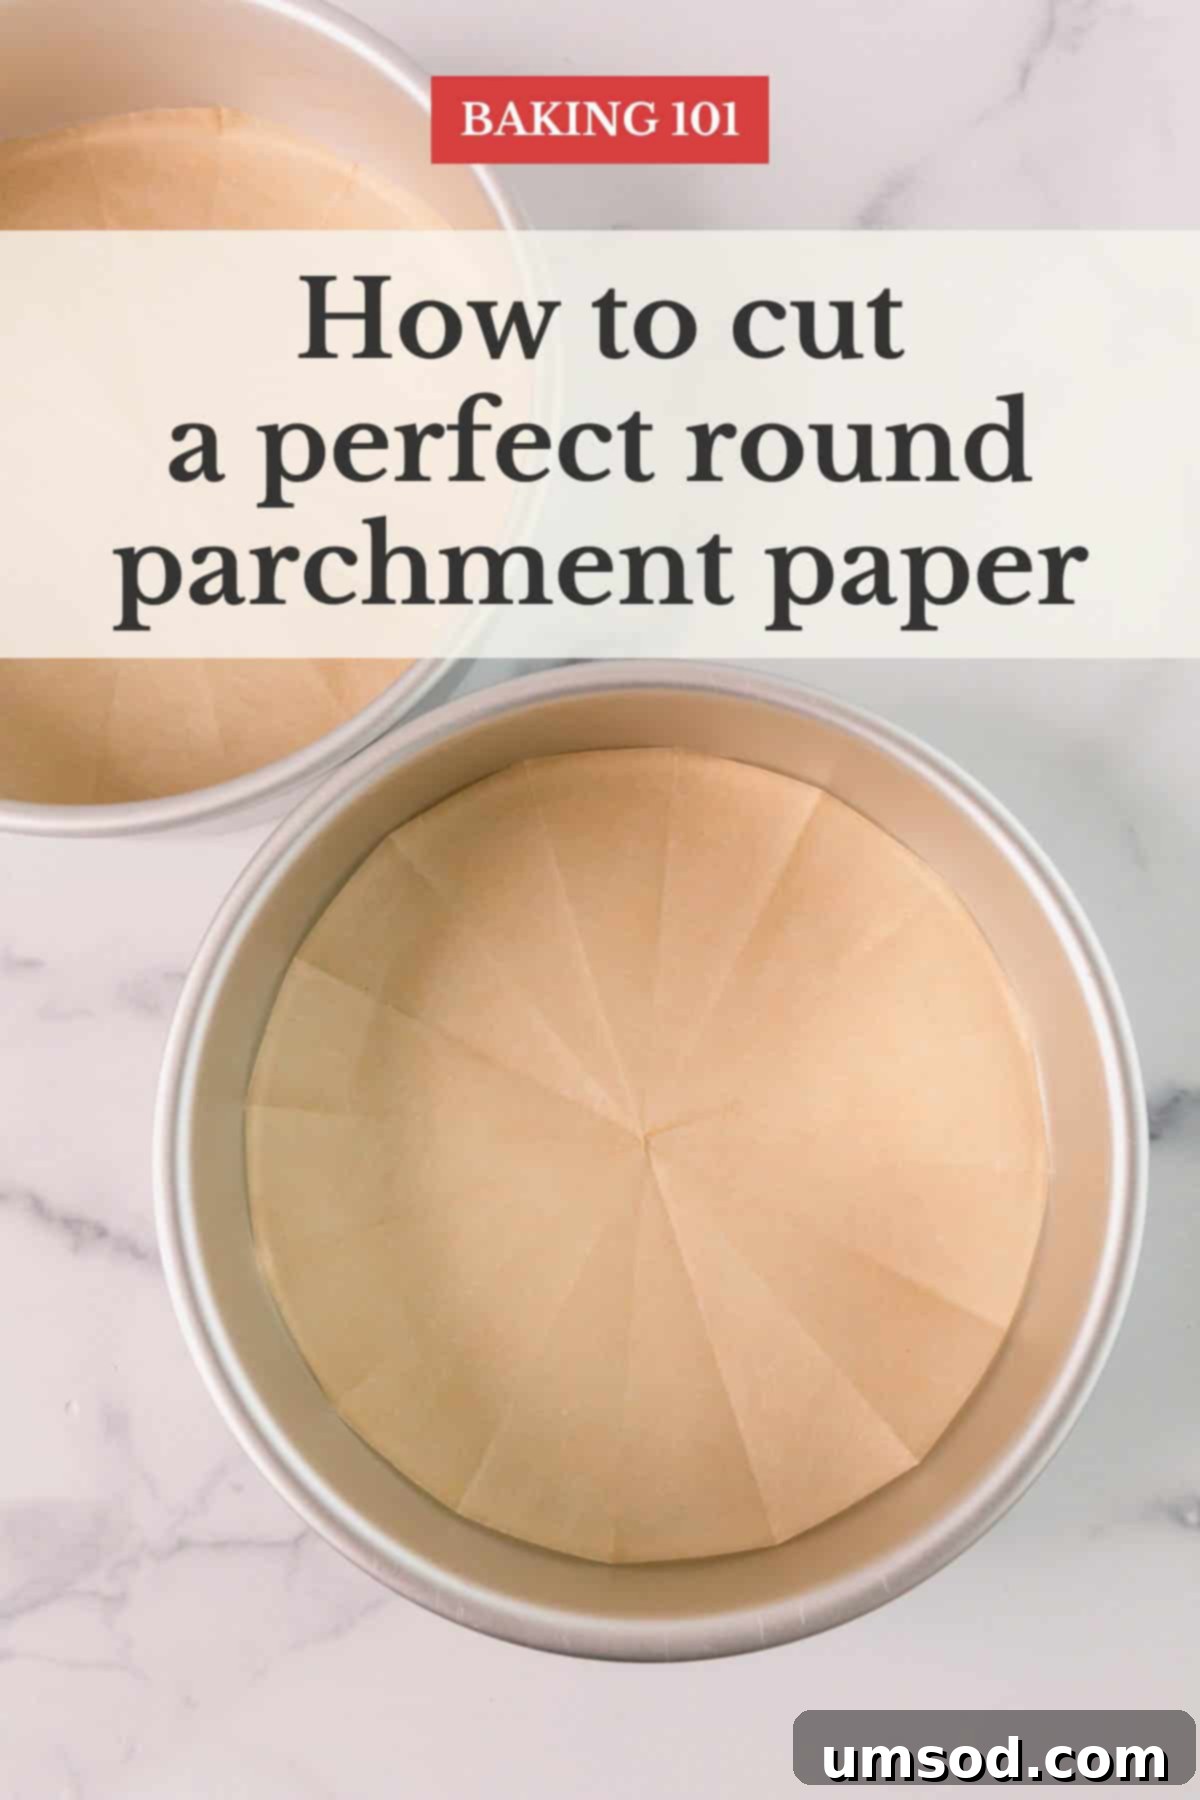
Achieving baking perfection often hinges on small, crucial details. One of the most common frustrations for home bakers is a cake sticking to the pan, potentially ruining hours of effort and a beautiful creation. The simple solution lies in properly lining your cake pans with parchment paper. But how do you get that perfectly sized round piece of parchment without fuss or waste? Forget imprecise tracing or the recurring expense of pre-cut rounds. This comprehensive guide will walk you through the incredibly simple, yet highly effective, square-to-triangle method – a time-honored technique that will transform your baking experience. Say goodbye to stuck cakes and uneven edges, and hello to flawlessly released treats every single time!
Why Parchment Paper is Your Baking Best Friend
Parchment paper is an indispensable tool in any baker’s arsenal. Its superior non-stick properties provide a crucial barrier between your delicate cake batter and the metal of the pan, ensuring a smooth, effortless release every time. This not only prevents cakes from sticking but also contributes to a more even bake, stopping the bottom of your cake from browning too quickly. Beyond functionality, using parchment paper makes cleanup significantly easier, minimizing mess and saving you precious time and effort after baking. It’s truly the secret weapon for achieving that professional, clean finish on all your baked goods, making it a true best friend in the kitchen.
The Pitfalls of Alternative Cake Pan Lining Methods
While there are other approaches to lining your cake pans, they often come with their own set of drawbacks, making the square-to-triangle method stand out for its sheer efficiency, accuracy, and cost-effectiveness.
The Convenience Trap of Pre-Cut Parchment Rounds
Certainly, you can find pre-cut parchment rounds readily available in most baking aisles or online retailers. They promise unparalleled convenience, but this often comes at a higher cost per sheet compared to a standard roll. If you’re an avid baker with a diverse collection of various cake pan sizes – from small 6-inch pans to standard 8-inch or 9-inch, large 10-inch, or even specialty shapes – stocking up on an array of pre-cut sizes can quickly become expensive and logistically overwhelming. Your pantry might end up filled with multiple boxes of different parchment rounds, taking up valuable storage space. What’s more, you might not always find the exact size you need, leading to frustrating compromises or last-minute trips to the store.
The Fussiness and Inaccuracy of Tracing and Cutting
Another common approach is to place your cake pan directly onto a sheet of parchment, trace its outline with a pencil or marker, and then cut it out with scissors. While seemingly straightforward, this method can often lead to less-than-perfect results and unnecessary frustration. It’s all too easy for the pencil to slip, or for your scissors to stray from the line, resulting in an uneven or slightly oversized circle. An oversized circle will wrinkle and buckle when placed into the pan, creating undesirable indentations or uneven spots on your cake’s bottom. Trimming it down requires further fiddling, adding unnecessary time and effort to your baking preparation. It’s a method that promises precision but often delivers minor imperfections and wasted parchment paper.
Introducing the “Square-to-Triangle” Method: Precision in Simplicity
This traditional “square-to-triangle” method is a time-tested technique cherished by professional bakers and home cooks alike for its unparalleled ease and accuracy. It’s incredibly fast once you master the simple folding sequence, quickly becoming second nature with just a couple of practice runs. The true beauty of this method lies in its ability to consistently yield a perfectly sized, symmetrical parchment circle for any round cake pan, every single time. No more wasted paper, no more lopsided cuts, and certainly no more sticky cake bottoms. It’s an essential, foundational skill that saves you money, time, and ensures a consistently superior baking outcome, providing a flawless base for all your culinary creations.
Essential Tools for Perfect Parchment Rounds
Gathering these simple tools is the effortless first step towards mastering this indispensable baking technique. You’ll be pleased to know you likely already have everything you need conveniently available in your kitchen:
- Parchment Paper: A standard roll of parchment paper is ideal and generally more economical, offering flexibility for various pan sizes. Pre-cut flat sheets can also be used, provided they are large enough.
- Round Cake Pan: Any size will work flawlessly with this adaptable method, from small individual ramekins to large multi-tiered cake pans.
- Sharp Scissors: A good, sharp pair of kitchen scissors is crucial for achieving a clean, precise cut, which contributes to the overall neatness of your parchment circle.
How to Cut Parchment Paper for a Round Cake Pan: A Step-by-Step Guide
Follow these detailed instructions, and you’ll be cutting perfect parchment rounds with confidence and speed in no time. Pay close attention to the folding sequence, as it is the fundamental key to this method’s remarkable accuracy and efficiency.
1. Prepare Your Parchment and Execute the Initial Folds
Begin by selecting a piece of parchment paper that is generously wider than the diameter of your chosen cake pan. It is always better to start with a slightly larger piece than one that’s too small, as you can easily trim any excess later.
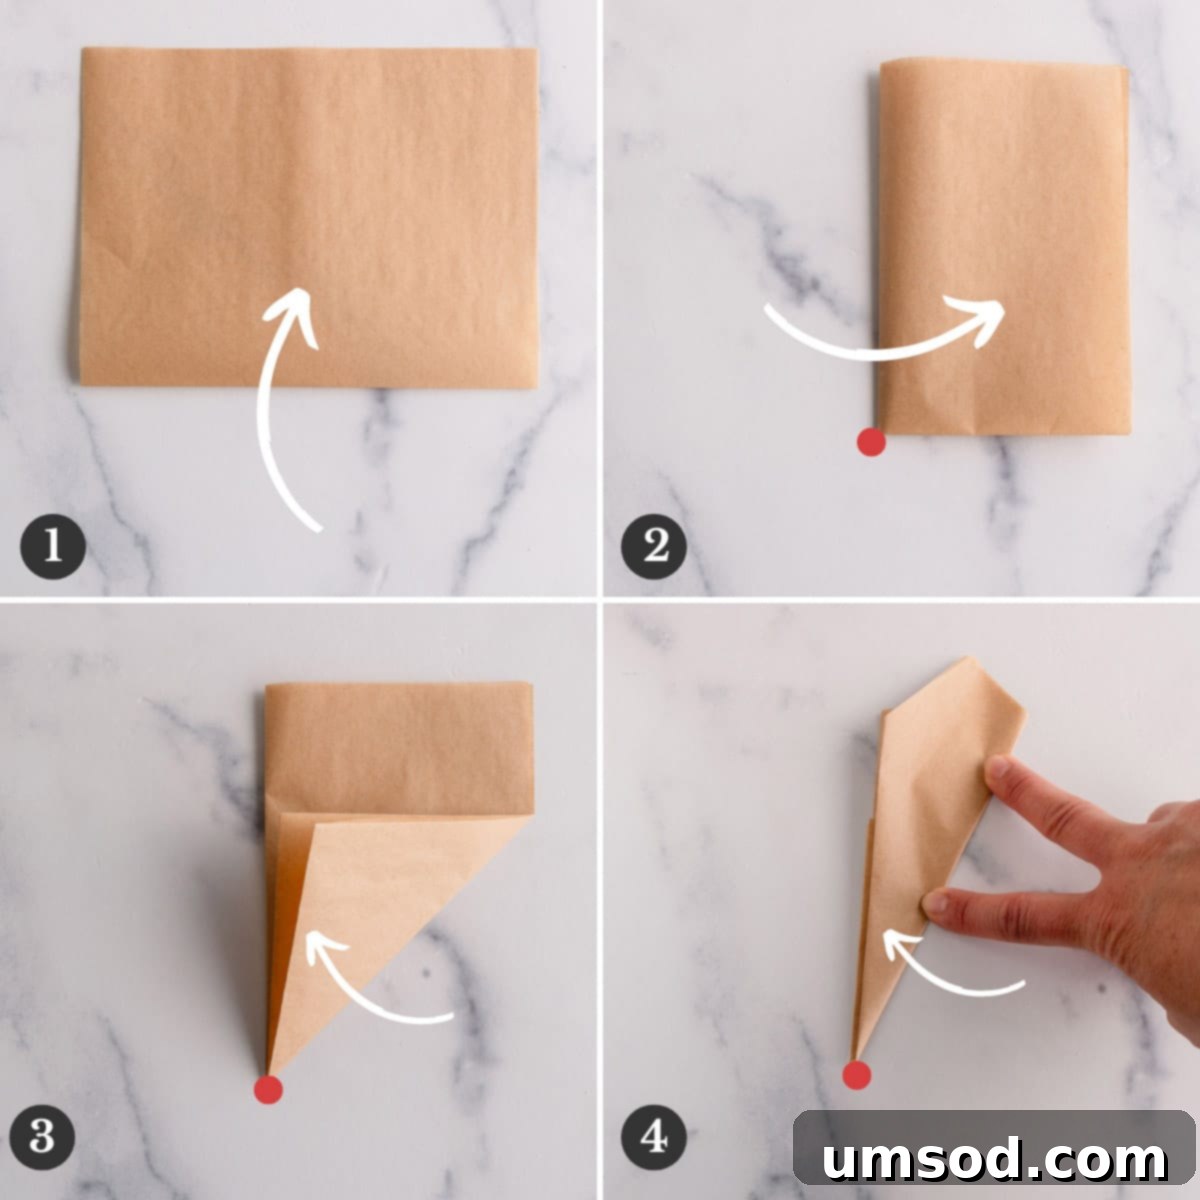
- First Fold: Horizontal Half: Lay the sheet of parchment paper flat and smooth on a clean counter or table surface. Carefully fold it in half, bringing the bottom edge up to meet the top edge. Press firmly along the fold to create a sharp, distinct crease down the middle. Smooth out any trapped air bubbles for a crisp fold.
- Second Fold: Vertical Half & Identify Closed Corner: Next, take your horizontally folded parchment and fold it in half again, this time from left to right. Once this fold is complete, orient the paper so that the corner where *all* the closed (folded) edges converge is positioned in the bottom-left corner. This unique, multi-layered closed corner is critically important; it will ultimately become the precise center point of your perfectly finished parchment round.
- Third Fold: First Diagonal Triangle: Now, take the bottom-right corner of your twice-folded parchment and fold it upwards diagonally. Carefully align its bottom edge perfectly with the creased side on the left. This action will begin forming your initial triangle shape, with the crucial closed corner remaining securely fixed at the bottom-left.
- Fourth Fold: Second Diagonal Triangle: To make the triangle smaller and more manageable for accurate cutting, fold it once more in the same diagonal direction. Bring the new bottom-right corner upwards, again aligning the folded edge precisely. You will now have a compact, multi-layered triangle. It is imperative that the vital closed corner remains securely in the bottom-left position throughout this final fold. This condensing fold streamlines the paper, making the subsequent cutting step far more precise.
Pro Tip: The Closed Corner is Absolutely Key!
Throughout all the folding steps, always ensure you are bringing the creased or closed sides of the parchment paper together. The single most important element to remember is to keep the closed corner of your triangle (which is often visually marked with a red dot in diagrams, much like the image above) in one fixed position. This critical corner should never be folded up, shifted, or compromised at any point in the process. This specific closed corner is the exact point that will form the center of your perfectly circular parchment liner. Any slight movement or inaccuracy of this corner will unfortunately result in an asymmetrical or imperfect circle.
2. Measure and Cut with Precision
With your perfectly folded, compact triangle ready, the next step is to accurately measure and cut it to precisely match the radius of your cake pan. This is where the magic of the method truly shines, guaranteeing a flawless fit that will make your cakes release beautifully.
- Position the Triangle for Accurate Measurement: Gently pick up your folded parchment triangle. Carefully place its crucial closed corner directly and snugly into the very center of the bottom of your round baking pan. Ensure the tip is securely seated at the true center point, as this is critical for an accurate radius measurement.
- Mark the Pan’s Radius: With the closed corner perfectly centered, allow the folded parchment to extend outwards towards the edge of the pan. Observe the exact point where the flat bottom of the pan meets its vertical side wall. This precise intersection defines the true radius of your pan. Using your thumbnail, gently but firmly crease the parchment paper at this precise intersection. You can also make a light pencil mark if you prefer, though a clean crease is often sufficient and quicker for experienced bakers.
- Make the Clean Cut: Carefully remove the parchment triangle from the pan. Using your sharp scissors, cut precisely along the creased or marked line you just made. Aim for a smooth, confident, and single cut rather than a jagged one. This line defines the exact circumference of your future parchment circle.
- Unfold to Reveal Perfection: Finally, gently unfold your carefully cut parchment paper. You will be absolutely amazed to discover a perfectly symmetrical, impeccably round piece of parchment that is precisely the same size as your cake pan’s base.
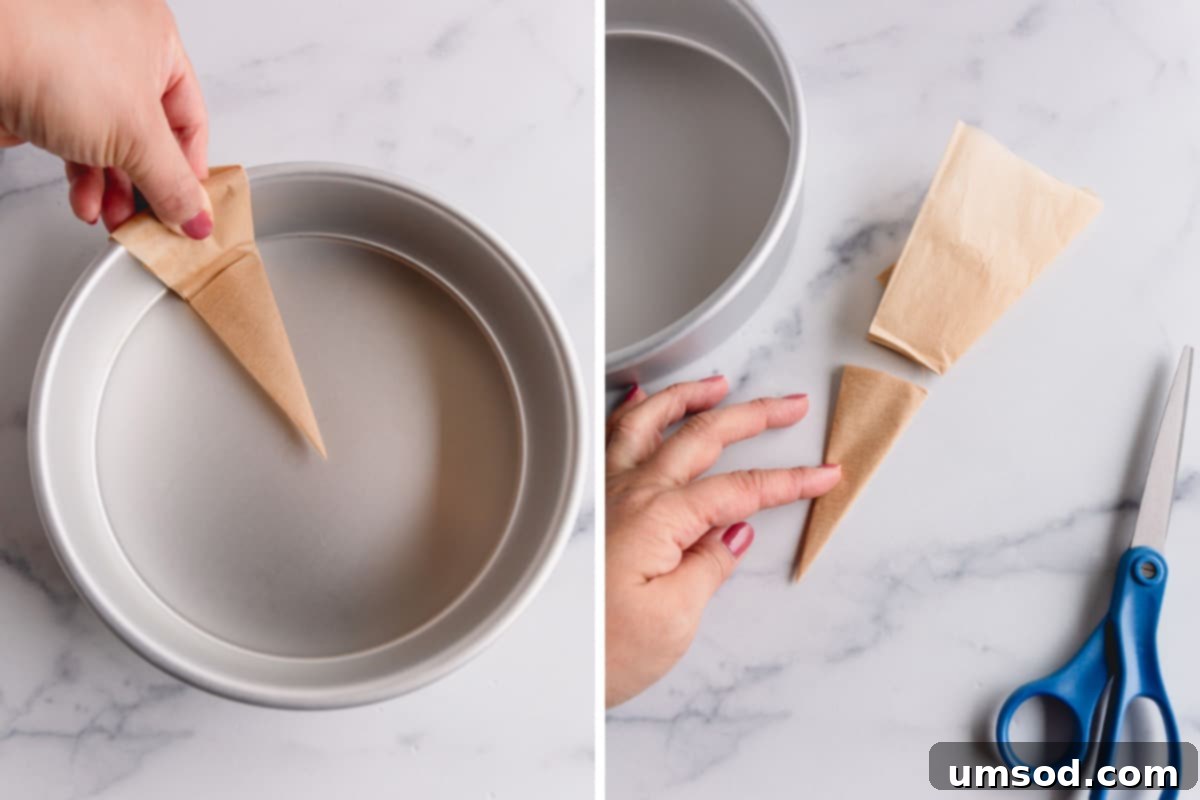
Critical Measuring Accuracy for a Flawless Fit
For the most precise and perfectly fitting parchment round, I strongly recommend placing the parchment triangle *inside* the pan to measure its radius. Measuring against the *outside* edge or rim of the pan can often lead to a slightly larger parchment round, which will then cause annoying wrinkles and buckling when placed into the pan. By meticulously measuring from the *inside* center to the *inside* edge of the pan, you guarantee a snug, flat fit that will not interfere with your cake’s shape or texture, ensuring a beautiful, unblemished bottom.
Voila! The parchment round fits absolutely perfectly inside your cake pan, sitting completely flat and ready to ensure your cake bakes beautifully and releases effortlessly. This simple, elegant method truly makes a world of difference in your baking results!
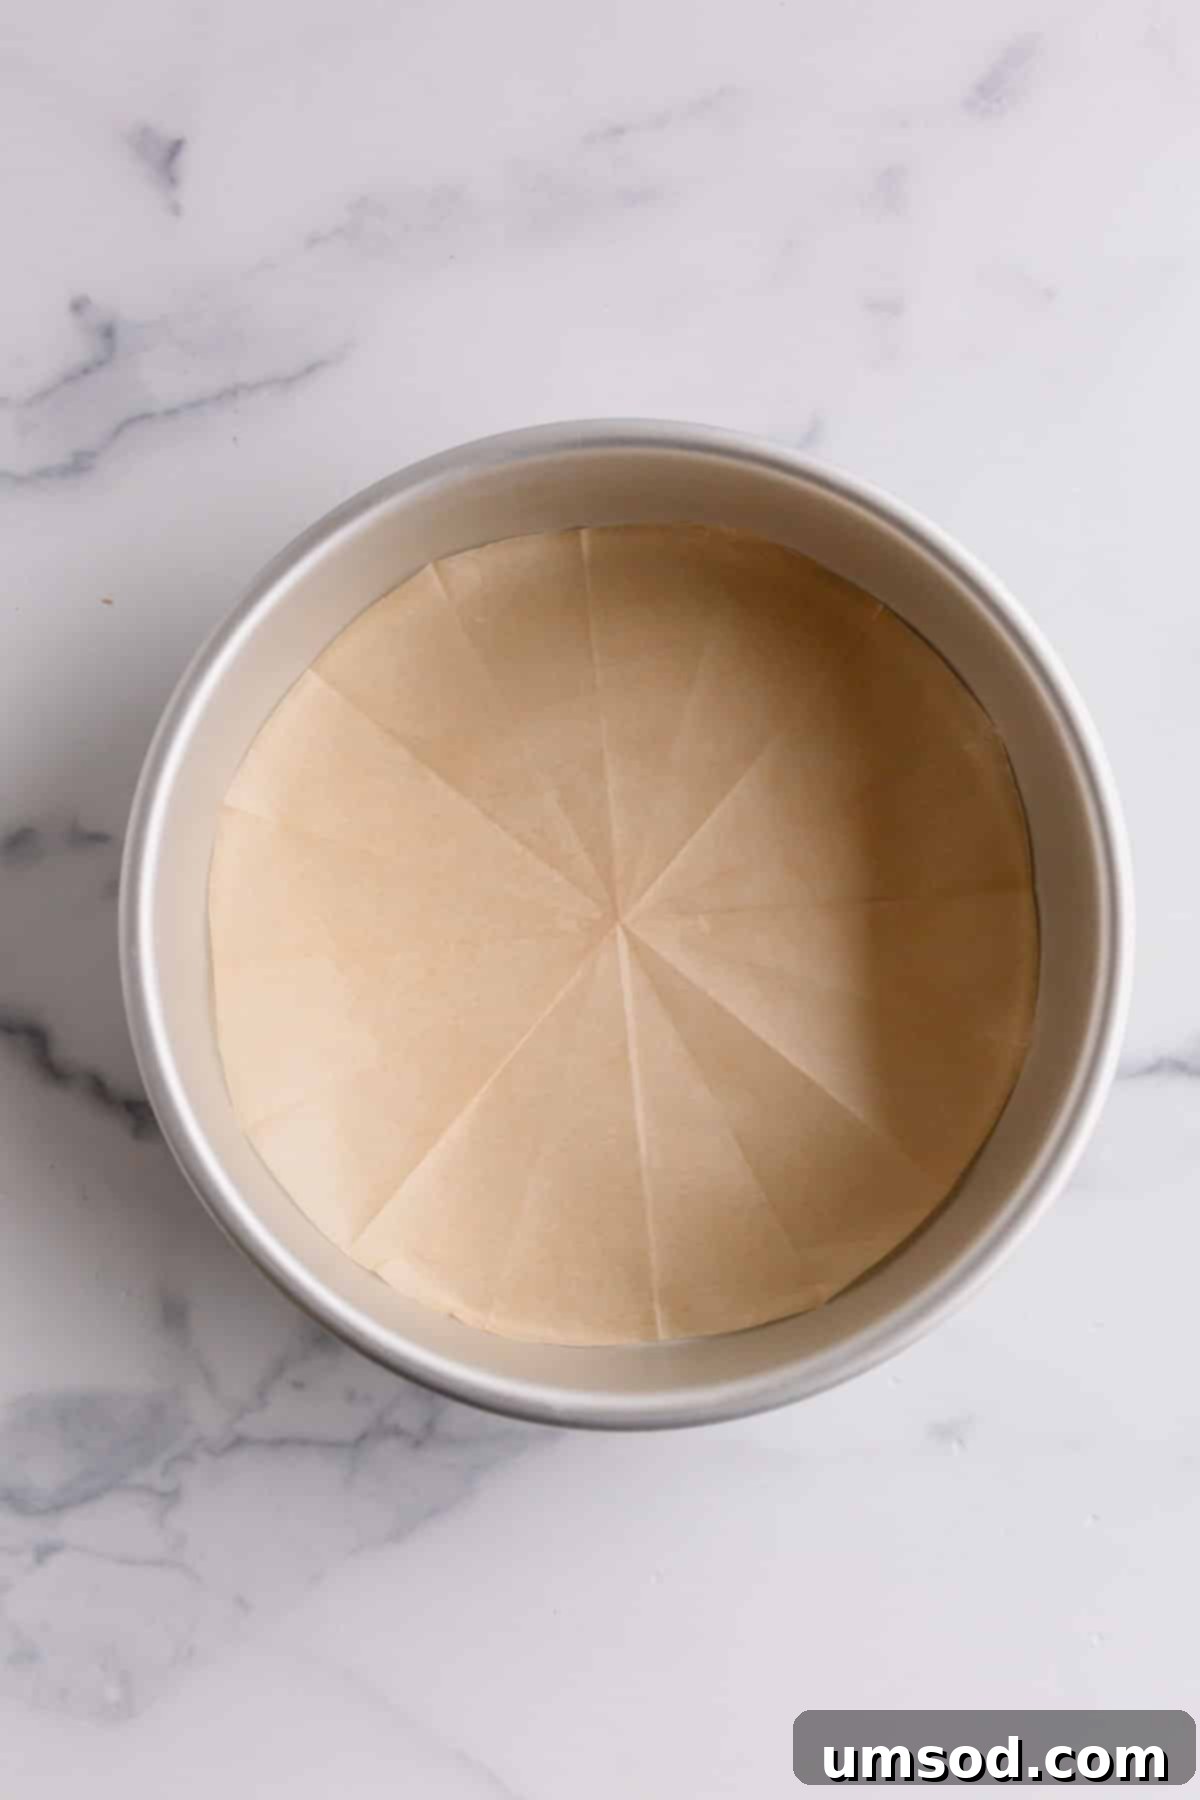
Advanced Tips for Baking Success with Parchment Paper
Mastering the parchment cutting technique is a significant step towards achieving consistently perfect cakes. Here are a few additional tips to further elevate your baking game and ensure the best possible results:
- Lightly Grease the Pan First: Even though parchment paper boasts excellent non-stick properties, applying a very light layer of butter, oil, or baking spray to the bottom of the pan *before* placing the parchment down serves a crucial purpose. It helps the parchment adhere smoothly to the pan’s base, preventing any shifting or buckling when you pour in your cake batter.
- Consider Side Strips for Tall Cakes: For very tall cakes, delicate recipes, or those notorious for sticking on the sides, you might want to line the sides of the pan as well. To do this, simply cut long strips of parchment paper (equal to the pan’s height plus an inch or two for overlap) and secure them to the greased side walls of the pan. This creates a complete non-stick barrier.
- Reusing Parchment: If your parchment paper isn’t heavily soiled, excessively browned, or baked at extremely high temperatures, it can often be wiped clean with a damp cloth and reused for another batch of cookies, roasting vegetables, or a less sticky cake. This is a fantastic way to be more sustainable and economical in your kitchen.
- Storing Parchment Correctly: To prevent your parchment paper from curling excessively (which can make it harder to work with), always store your roll in its original box or keep flat sheets pressed flat under other baking supplies.
Beyond Cakes: Other Versatile Uses for Parchment Paper in Your Kitchen
Parchment paper’s incredible utility extends far beyond just lining cake pans. Its non-stick, heat-resistant, and flexible nature makes it a true multi-tasker and an invaluable asset in countless culinary applications:
- Lining Baking Sheets: It’s absolutely essential for cookies, roasted vegetables, pastries, and breads to prevent sticking, ensure even browning, and make cleanup a breeze.
- Creating Disposable Piping Bags: Quickly cut a triangle from a sheet of parchment and roll it into a cone to create a temporary, disposable piping bag for frostings, melted chocolate, intricate decorations, or even savory purees.
- Cooking “En Papillote”: This elegant French technique involves wrapping food (such as delicate fish fillets, vegetables, and aromatic herbs) in parchment paper to steam them gently in their own juices. The result is incredibly flavorful, moist, and tender dishes with minimal cleanup.
- Separating Food for Storage: Use individual sheets to separate layers of cookies, hamburger patties, delicate pastries, or raw dough in the freezer or refrigerator, preventing them from sticking together and making them easy to retrieve.
- Working with Sticky Doughs: When rolling out sticky doughs like pie crusts, certain cookie doughs, or even pizza dough, place the dough between two sheets of parchment paper. This prevents it from sticking to your rolling pin and counter, allowing for effortless manipulation and perfect thickness.
Elevate Your Baking Confidence and Achieve Flawless Results
Mastering the simple square-to-triangle method for cutting parchment paper is more than just a clever kitchen hack; it’s a valuable investment in your overall baking confidence and skill set. By effectively eliminating the common frustration of sticky cakes and uneven pan liners, you free yourself to focus entirely on the creative joy and delicious outcome of your dessert creations. This fundamental technique is not only incredibly economical, saving you money from purchasing expensive, pre-cut rounds, but it’s also remarkably versatile, adapting flawlessly to any round cake pan you might own. So, grab your parchment, follow these easy, step-by-step instructions, and prepare to elevate your baking game to an entirely new level of flawless perfection. Your perfectly released, beautifully presented cakes will be the ultimate testament to this invaluable skill!
My Favorite Cake Recipes to Try!
Now that you’ve mastered the art of perfectly lining your pans, it’s the ideal time to put your newfound skills to good use! Here are some of my all-time favorite cake recipes that are sure to impress and delight:
- Classic White Cake Recipe: A timeless and elegant favorite, perfect for any celebration or special occasion.
- Best Yellow Cake Recipe: A rich, tender, and utterly delicious staple that everyone will love.
- Simple Chocolate Cake Recipe: An easy yet incredibly decadent treat for all chocolate lovers, perfect for a quick indulgence.
- Lemon Layer Cake: Bright, zesty, and wonderfully refreshing, ideal for spring or summer gatherings.
- Black Forest Cake: A decadent German classic featuring luscious layers of chocolate, cherries, and fresh cream.
