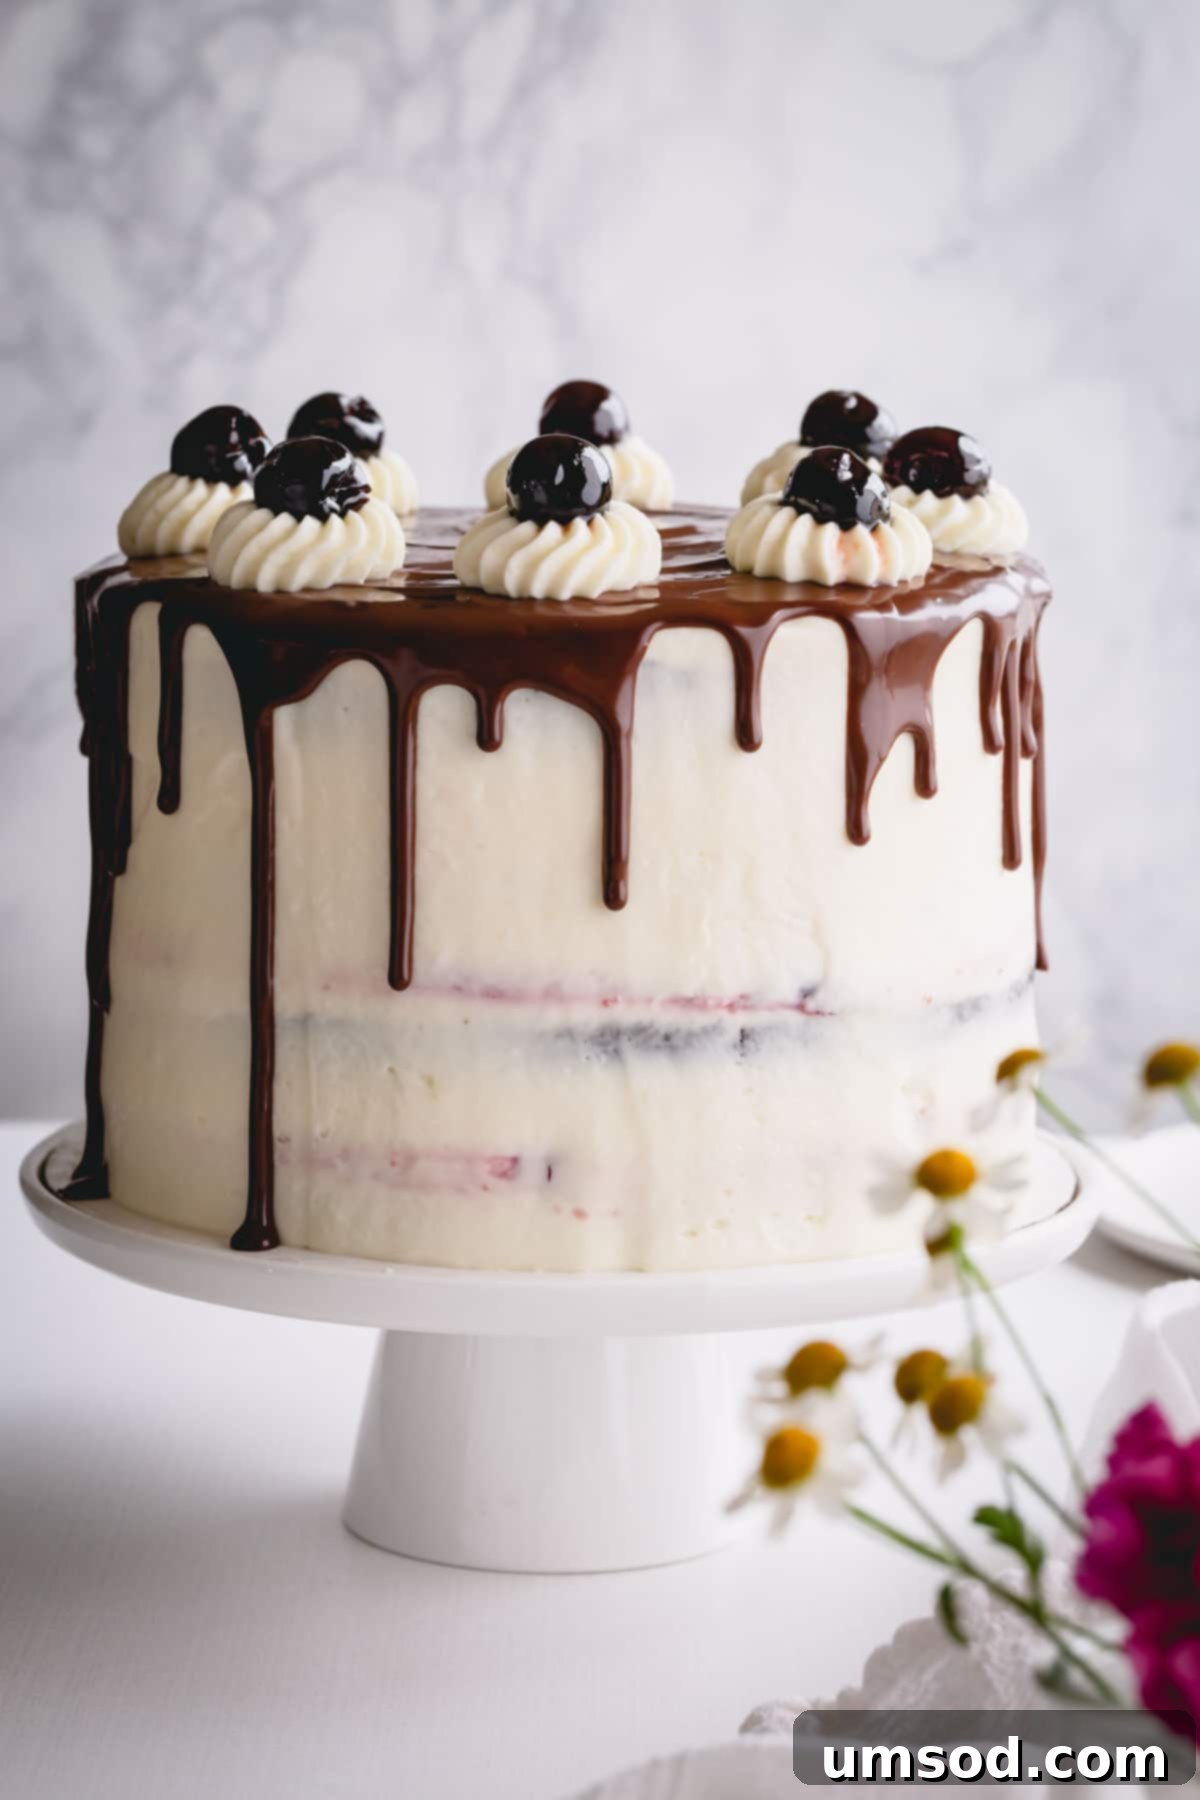
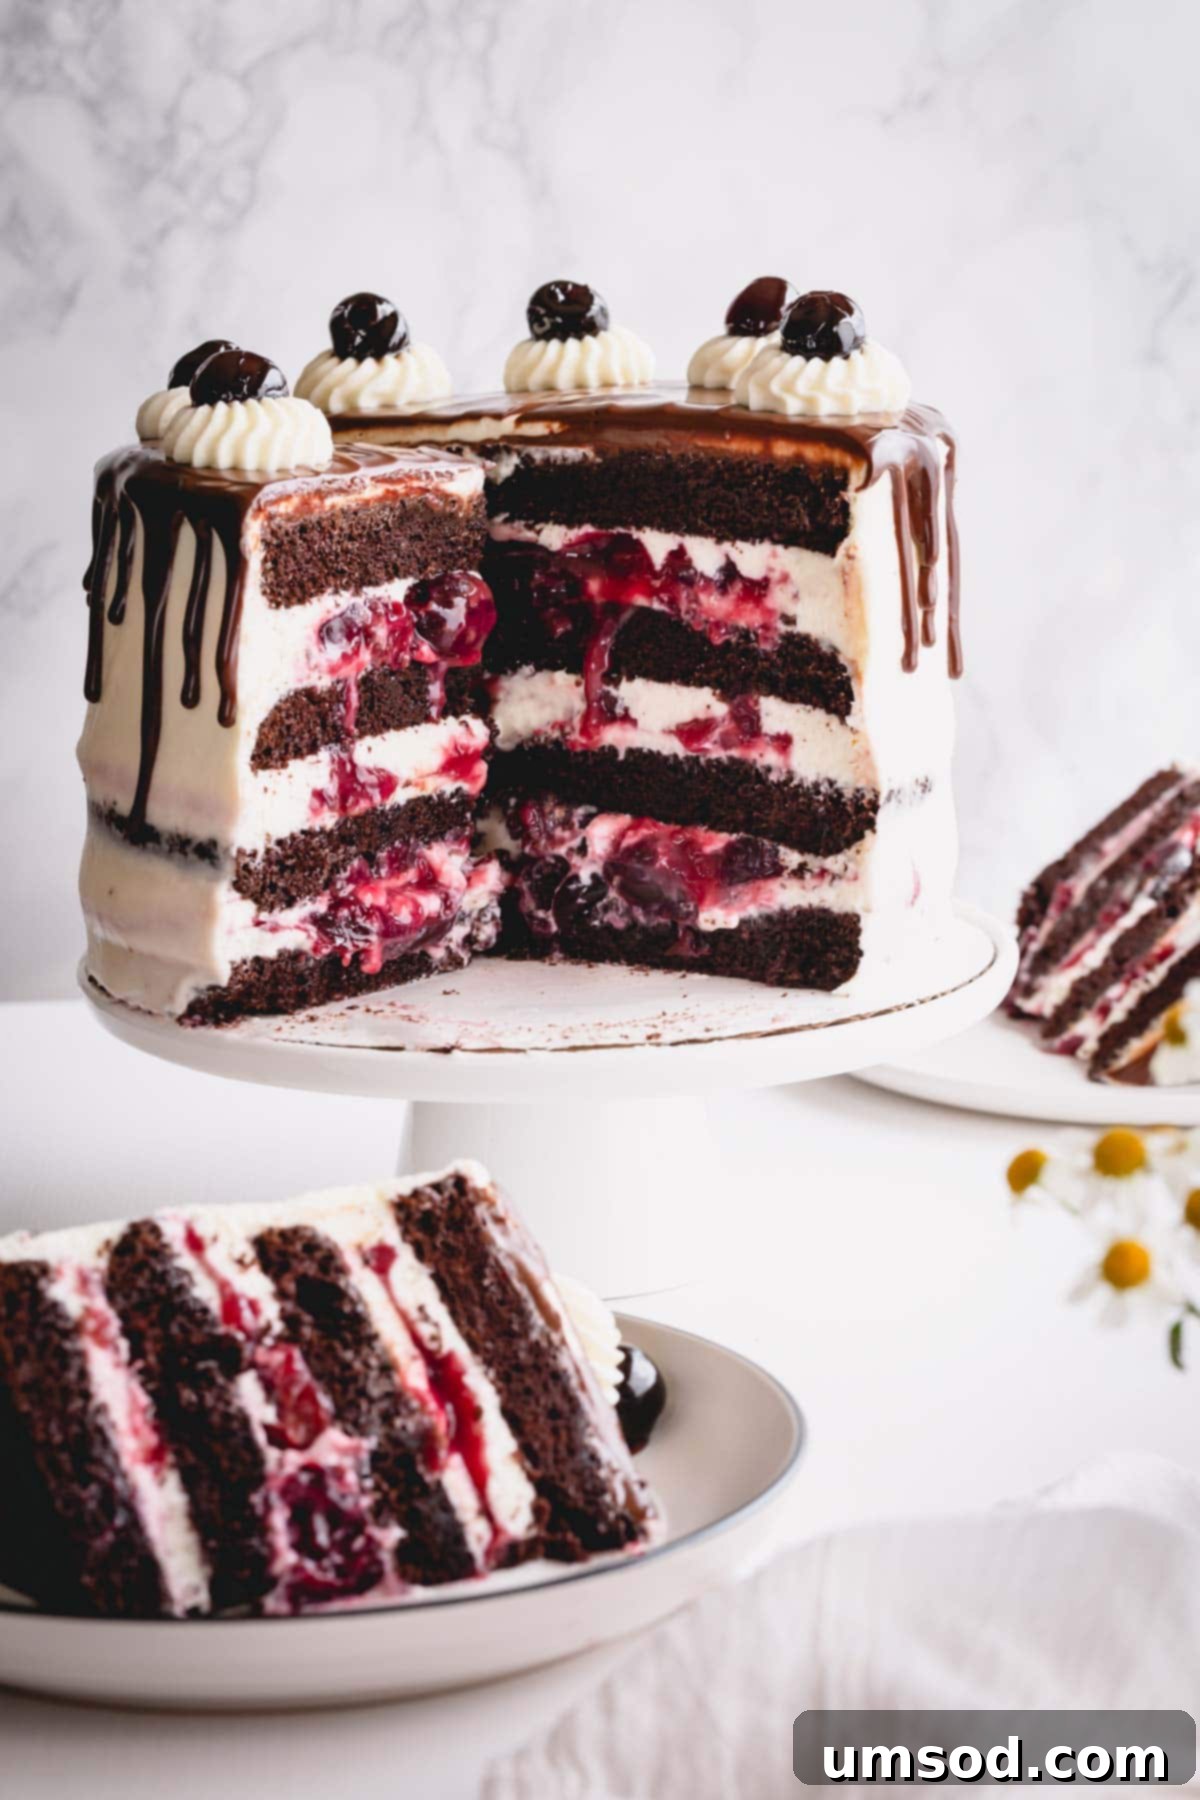
Embark on a culinary journey to create the ultimate Black Forest Cake. This recipe elevates the classic German dessert with its perfectly moist chocolate cake layers, a rich homemade cherry sauce bursting with natural flavor, and a light yet stable white chocolate mousse frosting. Prepare to impress with this showstopping cake that strikes the perfect balance between sweetness and decadent indulgence.
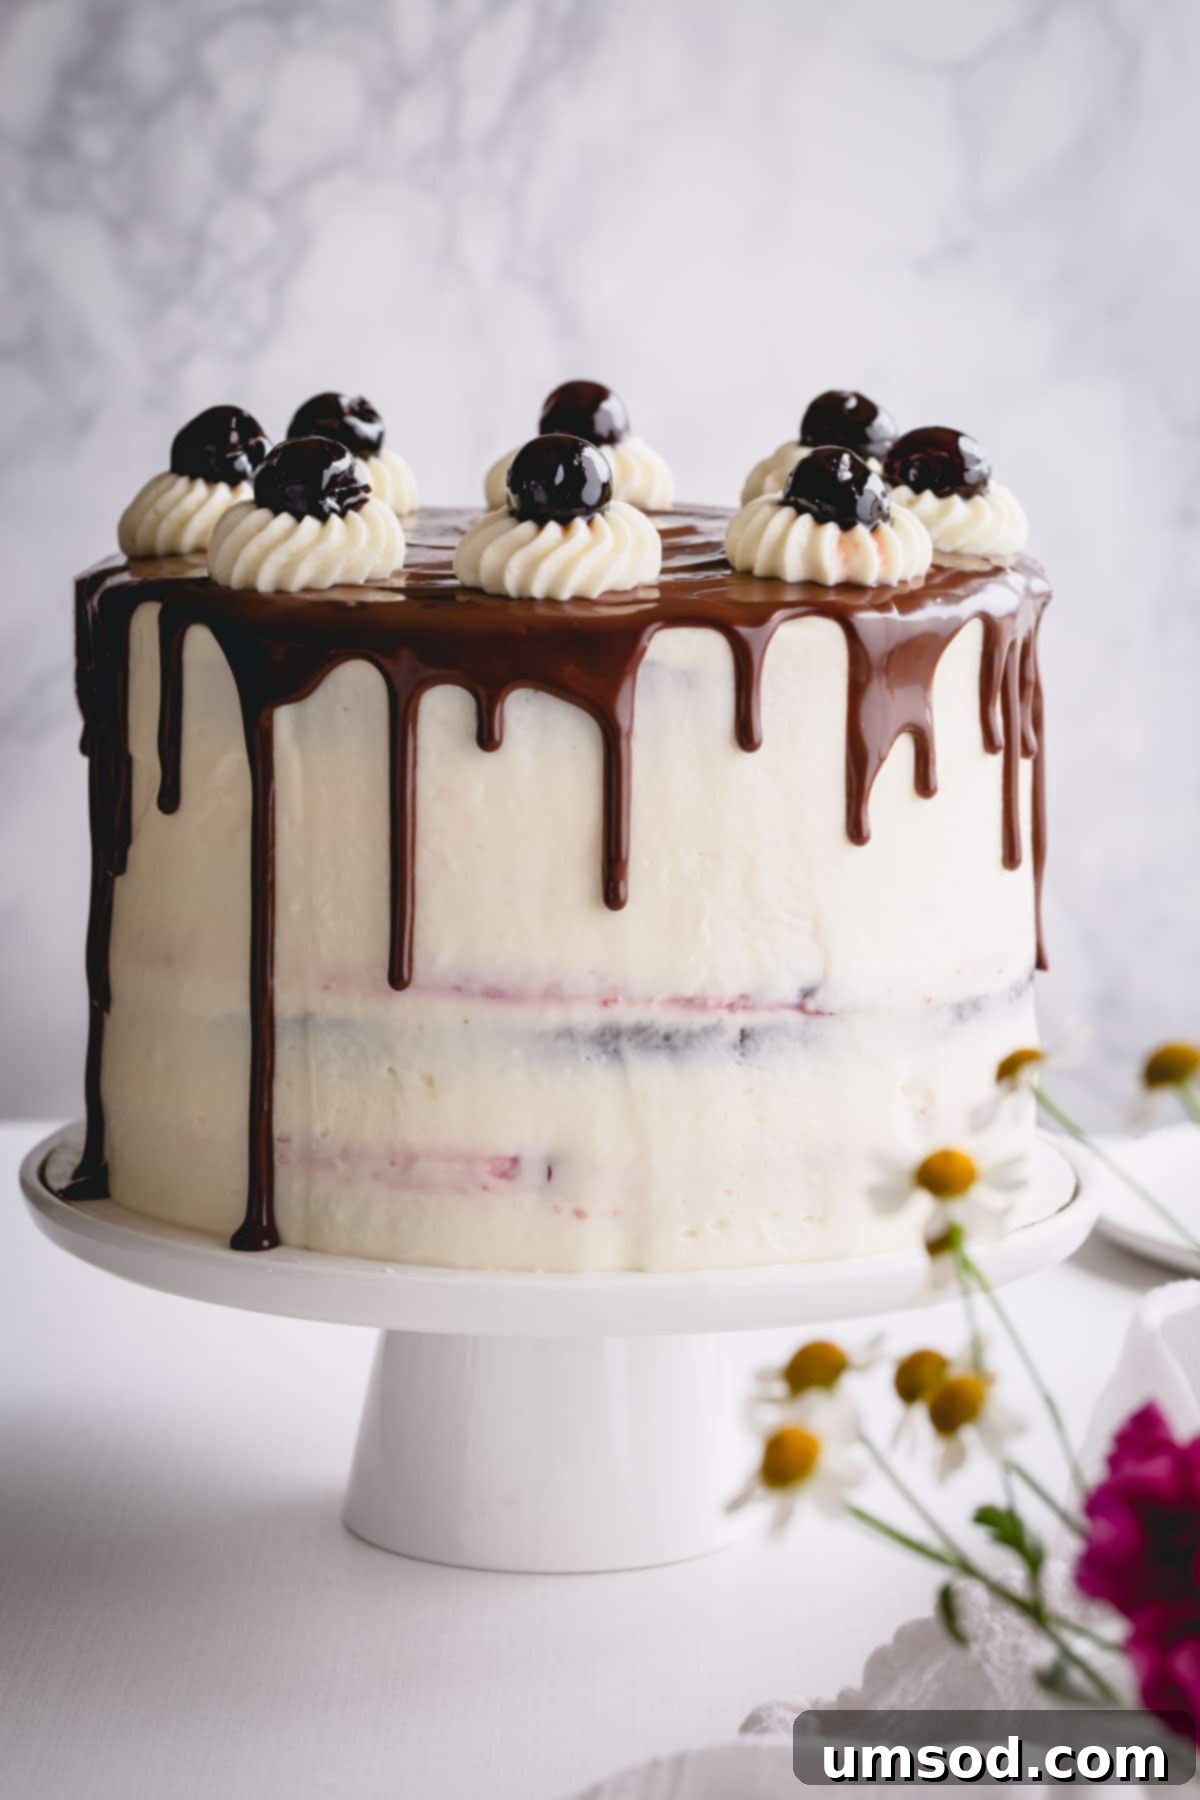
What is Black Forest Cake? Unveiling the Classic Schwarzwälder Kirschtorte
Known in its native Germany as “Schwarzwälder Kirschtorte,” Black Forest Cake is a celebrated dessert with a rich history. Traditionally, it features several layers of rich chocolate sponge cake, generously soaked in Kirschwasser (a clear cherry brandy). These cake layers are then generously filled with whipped cream and sweet cherry filling, and adorned with more whipped cream, chocolate shavings, and fresh or candied cherries. Its name is said to originate from the specialty liquor of the Black Forest region (Schwarzwald) or from the traditional costume of the women of the region, which includes a hat with large red pom-poms, resembling cherries.
Our rendition pays homage to this classic while introducing a few delightful upgrades. While maintaining the core flavors of chocolate and cherry, we’ve opted for a more stable and luxurious white chocolate mousse frosting and often use the cherry syrup from canned cherries for soaking, allowing for a non-alcoholic version that’s equally delicious.
Why You’ll Fall in Love with This Elevated Black Forest Cake Recipe
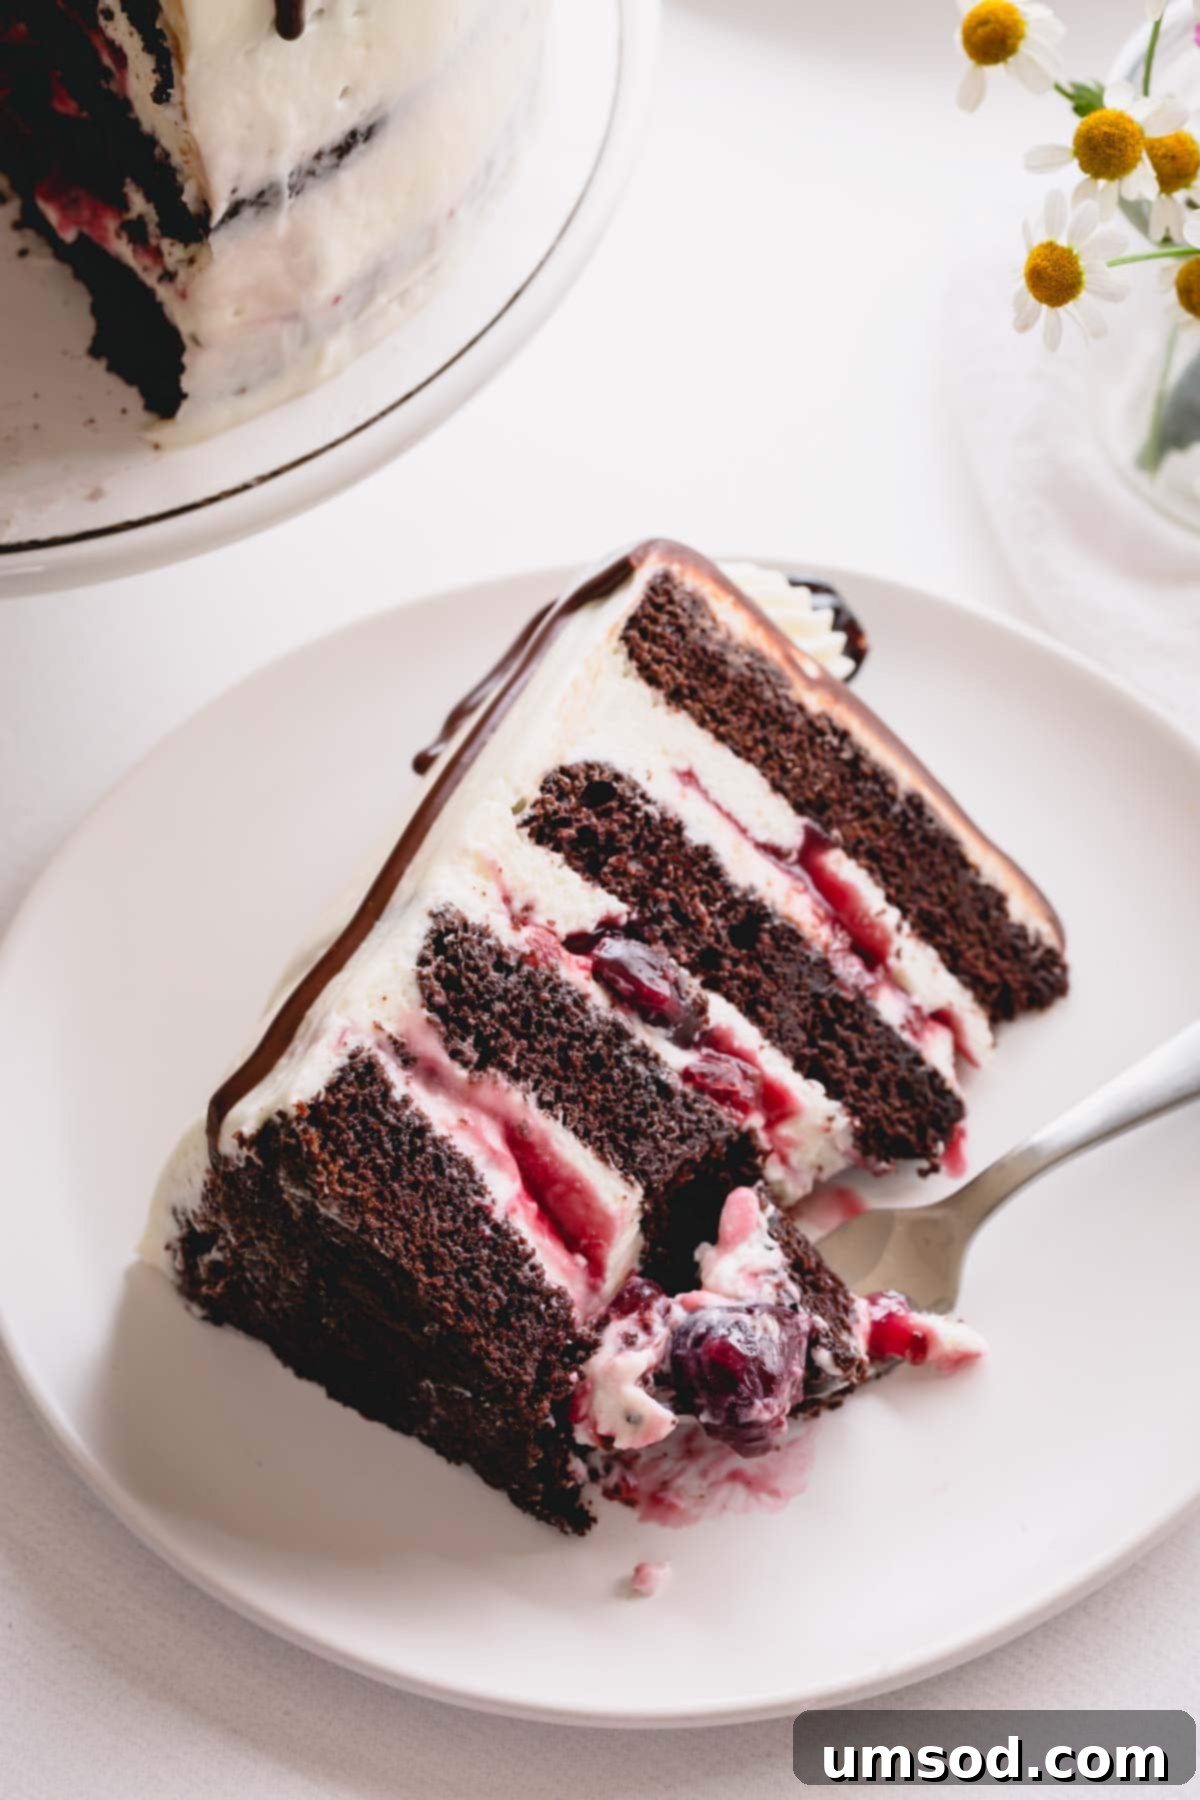
This isn’t just any Black Forest Cake; it’s an elevated experience designed to delight. Our enhanced recipe introduces a white chocolate mousse frosting that offers superior stability and an incredibly light, airy texture, ensuring it won’t droop or weep, even in warmer conditions. Here’s why this version is truly divine and promises to become your go-to recipe:
- Exquisite Beauty & Elegant Presentation: This towering confection is designed to be a showstopper. Its carefully layered structure and artful decoration make it perfect for special occasions, holidays, or simply when you want to create a truly memorable dessert.
- Irresistibly Moist Chocolate Cake Layers: We’ve perfected the chocolate cake base to be incredibly moist, rich, and flavorful, yet sturdy enough to support the generous fillings and frosting. Each bite is a testament to perfectly baked chocolate goodness.
- Light and Airy White Chocolate Mousse Frosting: Moving beyond traditional whipped cream, our white chocolate mousse provides a luxurious, cloud-like texture that melts in your mouth. It’s delicate but holds its shape beautifully, offering a sophisticated contrast to the rich chocolate and tangy cherries.
- Sweet and Tangy Cherry Filling: Whether you choose our homemade cherry sauce or a quality store-bought alternative, the vibrant cherry filling is the heart of this cake. Its sweet and slightly tart notes perfectly complement the chocolate and white chocolate flavors.
I must confess, once you’ve tasted this homemade Black Forest Gateau, you’ll likely find grocery store cakes forever ruined for you. This towering beauty is perfectly sweet without being cloying, remarkably light yet undeniably decadent, and it vanishes all too quickly – a true sign of its irresistible appeal!
Key Components of Your Decadent Black Forest Cake
Crafting this magnificent Black Forest Cake involves four distinct, yet harmoniously blended, elements that come together to create a symphony of flavors and textures:
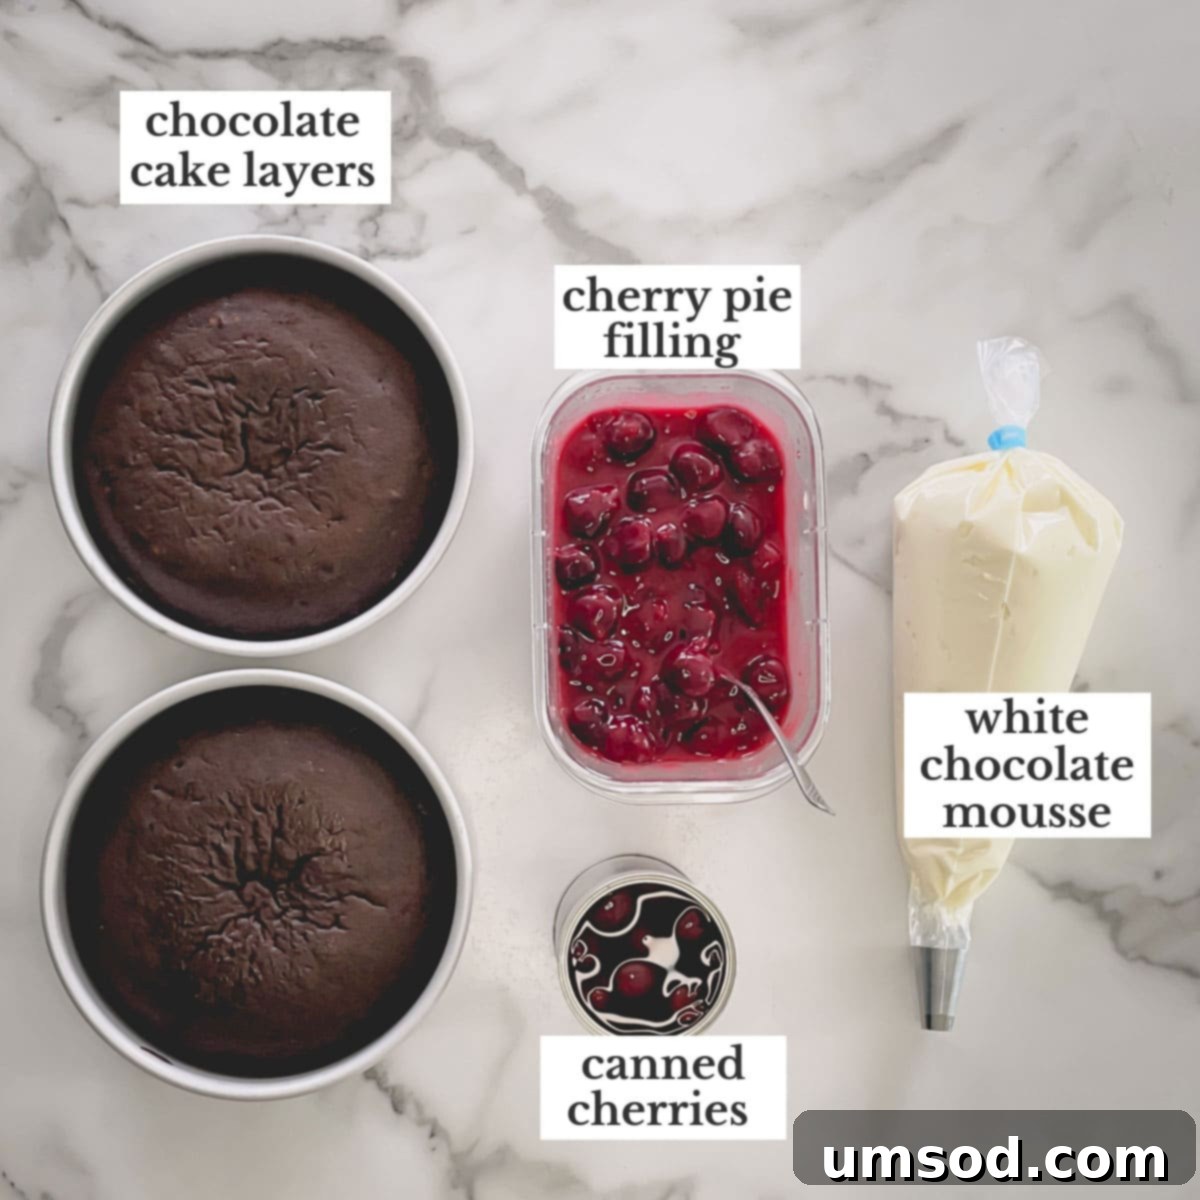
- Chocolate Cake Layers – The foundation of our cake is a soft, moist, and wonderfully sturdy chocolate cake. Designed to be rich in flavor yet resilient, these layers are ideal for stacking and holding the decadent fillings. A fantastic feature is that these cake layers can be baked well in advance, saving you precious time on assembly day.
- Sweet Cherry Filling – While a high-quality store-bought cherry pie filling can work in a pinch for convenience, our homemade version truly shines. It allows for a fresher, more intense cherry flavor and a perfectly balanced sweetness that elevates the entire cake. Like the cake layers, this filling can also be prepared ahead of time and chilled.
- White Chocolate Mousse Frosting – This is where our recipe takes an innovative turn. This light, airy, and fluffy mousse frosting provides a delightful contrast to the rich chocolate cake. It’s a simplified mousse that is not only divine in taste but also offers exceptional stability, ensuring your cake holds its elegant shape beautifully.
- Chocolate Ganache – Primarily used for its stunning visual appeal, a drizzle of chocolate ganache adds a touch of sophistication and another layer of chocolatey goodness. While its purpose is largely decorative, a little extra chocolate never hurt anyone, enhancing both the look and the taste profile.
- Canned Cherries (in syrup) – Beyond just garnishing, the syrup from these canned dark sweet cherries plays a crucial role. We’ll use this flavorful syrup to generously brush over the chocolate cake layers, imparting extra moisture and a subtle, delightful cherry essence throughout the cake. The cherries themselves are perfect for decoration.
Step-by-Step Guide: Crafting Your Perfect Black Forest Cake
1. Bake the Ultimate Moist Chocolate Cake Layers
The journey to a perfect Black Forest Cake begins with its foundation: the chocolate cake layers. For optimal results and ease of handling, I highly recommend baking these layers in advance. Once completely cooled, wrap them tightly in plastic wrap and refrigerate for up to 2 days, or freeze for up to 3 months. This not only makes them easier to slice but also helps develop their flavor and moisture.
For a detailed breakdown and visual guidance, I have a dedicated recipe post for the best simple chocolate cake, complete with step-by-step photos and a plethora of expert tips to ensure your cake layers are nothing short of perfection.
Pro Tip: Cake Temperature Matters!
Patience is key in baking! Never attempt to slice or frost a warm cake. Doing so will inevitably lead to a crumbling mess, and your precious frosting will melt into an unsightly soup. Always ensure your cake layers are thoroughly cooled, ideally chilled, before moving to the next steps.
2. Prepare the Luscious Cherry Sauce
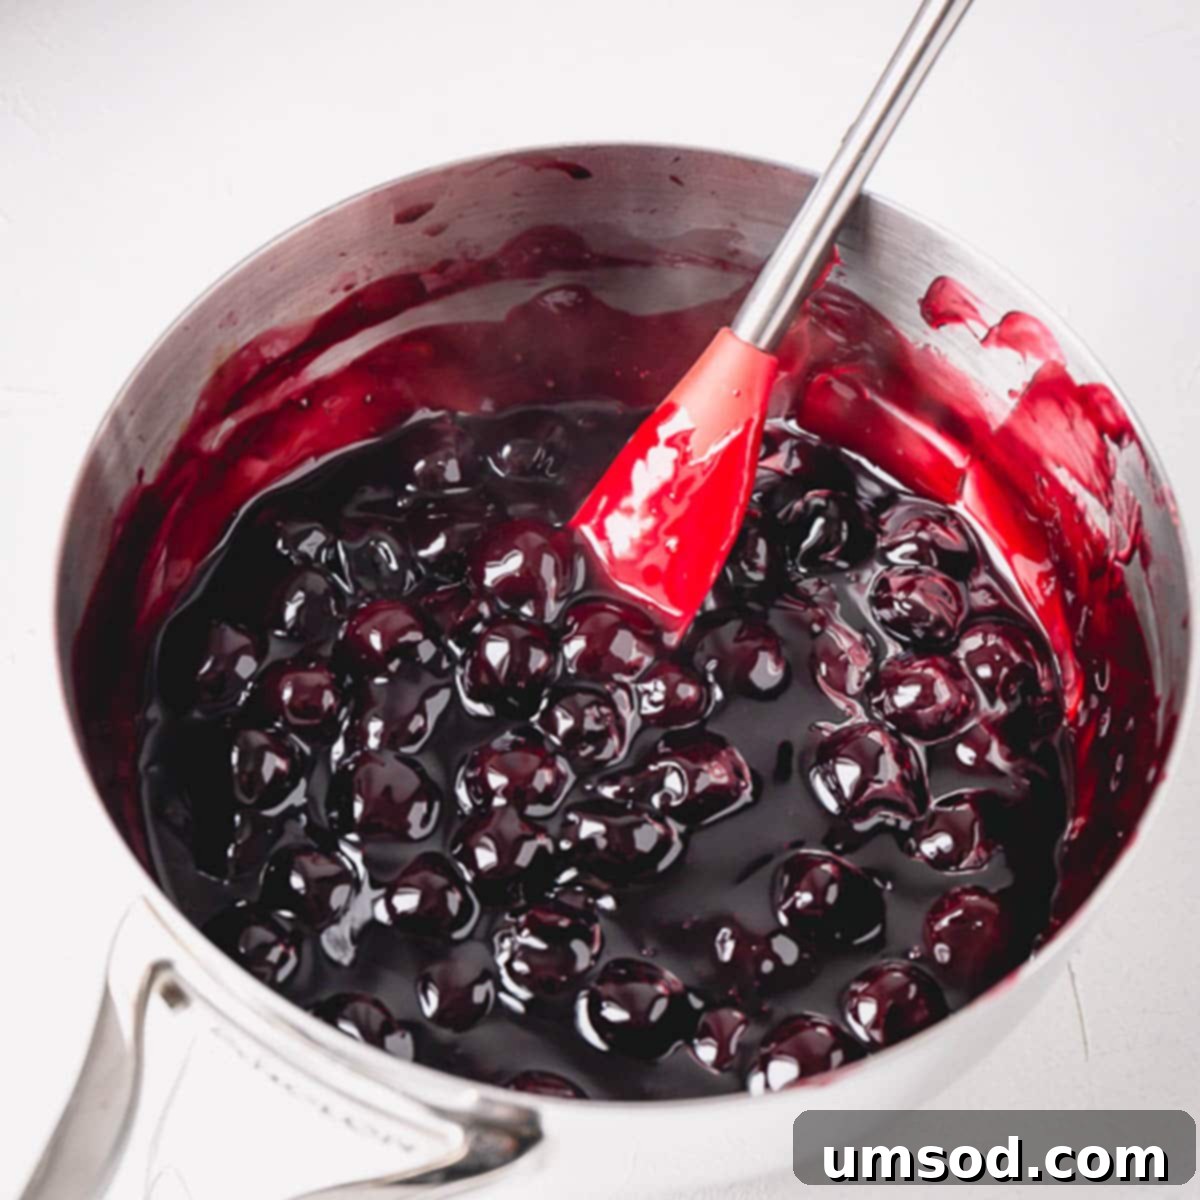
The cherry filling is a crucial component that brings the “forest” to your Black Forest Cake. For the best flavor and texture, I also recommend preparing the homemade cherry sauce at least a day in advance. This allows it to thoroughly chill and thicken, resulting in a perfectly set and delicious filling when you assemble your cake. The cooling process is essential for the sauce to achieve the ideal consistency.
If you’re pressed for time, a convenient alternative is to use one (21oz) can of high-quality cherry pie filling. While homemade offers superior flavor, a good store-bought option will still yield a delicious cake.
3. Craft the Silky White Chocolate Mousse Frosting
Unlike the chocolate cake and cherry sauce, the white chocolate mousse frosting is an element best prepared just before you’re ready to assemble your cake. Its light, airy texture is at its peak when freshly made. The gelatin within the mousse needs time to set, but preparing it too far in advance can make it overly firm and difficult to pipe and spread smoothly.
Ensure you have all your ingredients ready and chilled, and aim to make this frosting right before you begin the assembly process for the freshest, most luxurious result.
Essential Tip: Chill Your Cream!
A crucial step for perfect mousse frosting: always ensure your heavy cream is thoroughly chilled before you begin whipping it. Warm cream will simply not whip properly, leading to a runny, unstable mousse. Cold cream is essential for achieving those beautiful, stiff peaks!
4. Assemble Your Black Forest Masterpiece with Precision
With all your components prepared and chilled, it’s time for the exciting part: assembling your Black Forest Cake. Meticulous preparation before you start layering will ensure a smooth and successful process. Take your time with each step for a professional finish:
- Slice the Cake Layers: Carefully slice each cooled chocolate cake horizontally into two even layers. A long serrated knife or a cake leveler will help you achieve perfectly uniform layers, which are essential for a stable and beautiful cake.
- Prepare Mousse for Piping: Divide the silky white chocolate mousse frosting into two large piping bags. If you have them, fit the bags with a plain round tip; otherwise, simply snip off the ends of the bags to create an opening of about 1/2 inch. This allows for controlled and even distribution of the frosting.
- Strain the Cherries: Gently strain the canned dark sweet cherries, reserving all the luscious cherry syrup in a small bowl. This syrup is precious, as it will be used to moisten and infuse your cake layers with a subtle cherry flavor. The drained cherries will be used for decoration.
To assemble the layers for your Black Forest Cake:
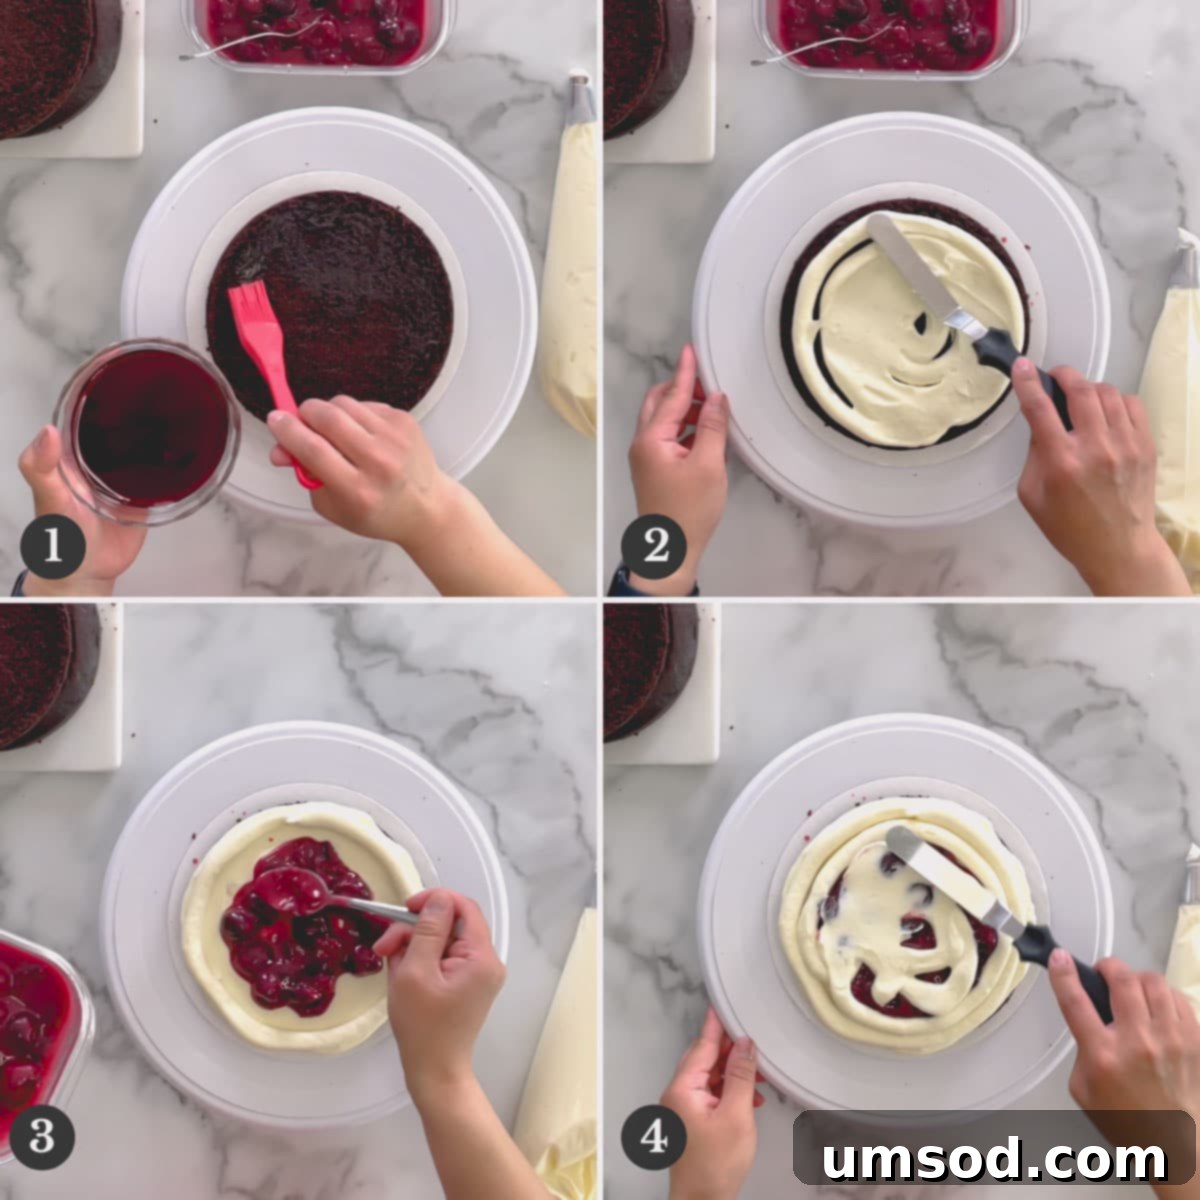
- First Layer Placement: Carefully place your first sliced cake layer onto a cake board or your desired serving platter. Using a pastry brush, generously and evenly brush some of the reserved cherry syrup all over the top surface of the cake. This step adds essential moisture and flavor.
- Mousse & Border: Using one of your piping bags, pipe a generous amount of mousse filling onto the cake layer. Use an offset spatula to gently spread the mousse evenly across the entire surface. Then, pipe a neat border of mousse around the very edge of this layer. This border acts as a dam, preventing the cherry filling from seeping out.
- Cherry Filling & More Frosting: Carefully spoon approximately one-third of your sweet cherry sauce into the middle of the piped mousse border. Gently spread it, leaving the mousse border intact. Top the cherry filling with a thin layer of mousse frosting, spreading it lightly to create an even surface for the next cake layer.
- Stacking Layers: Carefully place the next cake layer on top, aligning it perfectly. Repeat steps 1-3 until all your cake layers and filling components are assembled. Ensure each layer is brushed with cherry syrup and has a mousse dam before adding the cherry filling.
Smart Assembly Tip: Keep Your Cake Steady!
To prevent your cake from sliding during assembly and frosting, place a cake board on a turntable (if using) and smear a small amount of frosting directly in the middle of the board. This small dollop of frosting acts like “glue,” firmly securing the first cake layer and preventing any unwanted movement.
To frost the cake flawlessly:
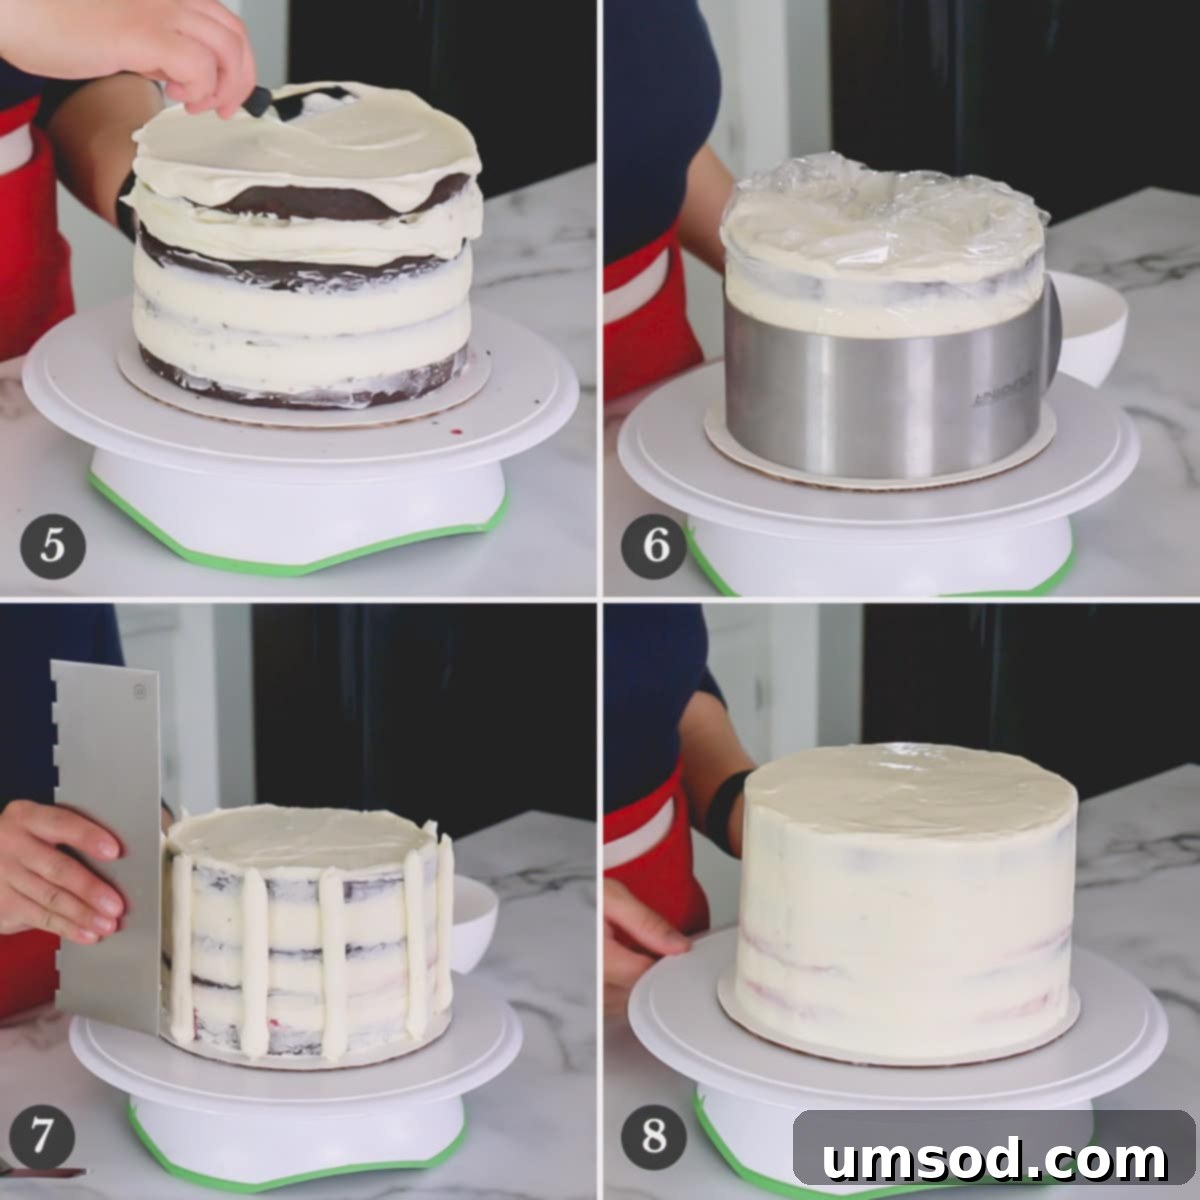
- The Crumb Coat: Begin by applying a thin, even layer of the white chocolate mousse frosting to the entire outside surface of the assembled cake. This is known as a “crumb coat,” and its purpose is to trap any loose cake crumbs, ensuring your final layer of frosting is perfectly smooth and crumb-free.
- Chill to Stabilize: Once the crumb coat is applied, gently wrap the cake in plastic wrap. If you have one, place a metal cake collar around the base of the cake for extra support. Refrigerate the cake for approximately one hour. This crucial chilling period allows the crumb coat to set and helps stabilize the entire cake structure, ensuring it stays nice and straight for the final frosting.
- Final Frosting Layer: After chilling, carefully remove the plastic wrap (and cake collar, if used) from the now-stabilized cake. Apply another generous layer of the white chocolate mousse frosting, working to create a smooth and even coating around the entire cake.
- Smooth Finish: Achieve a professional, sleek finish by smoothing the frosting with an offset spatula or a bench scraper. Take your time, rotating the cake on a turntable if you have one, to get those perfectly sharp edges and smooth sides.
5. Decorate Your Black Forest Cake with Flair
The final touch is the decoration, where your Black Forest Cake truly comes to life. These steps will add visual appeal and a final burst of flavor:
- Prepare Chocolate Ganache: Pour your dark chocolate ganache into a squirt bottle or a small piping bag. It’s essential that the ganache is flowing but not hot. A warm temperature will cause it to melt your beautiful mousse frosting.
- Prepare Mousse for Piping: Transfer a small amount of the remaining white chocolate mousse frosting into a piping bag fitted with a large star tip. This will be used to create decorative dollops on top of the cake.
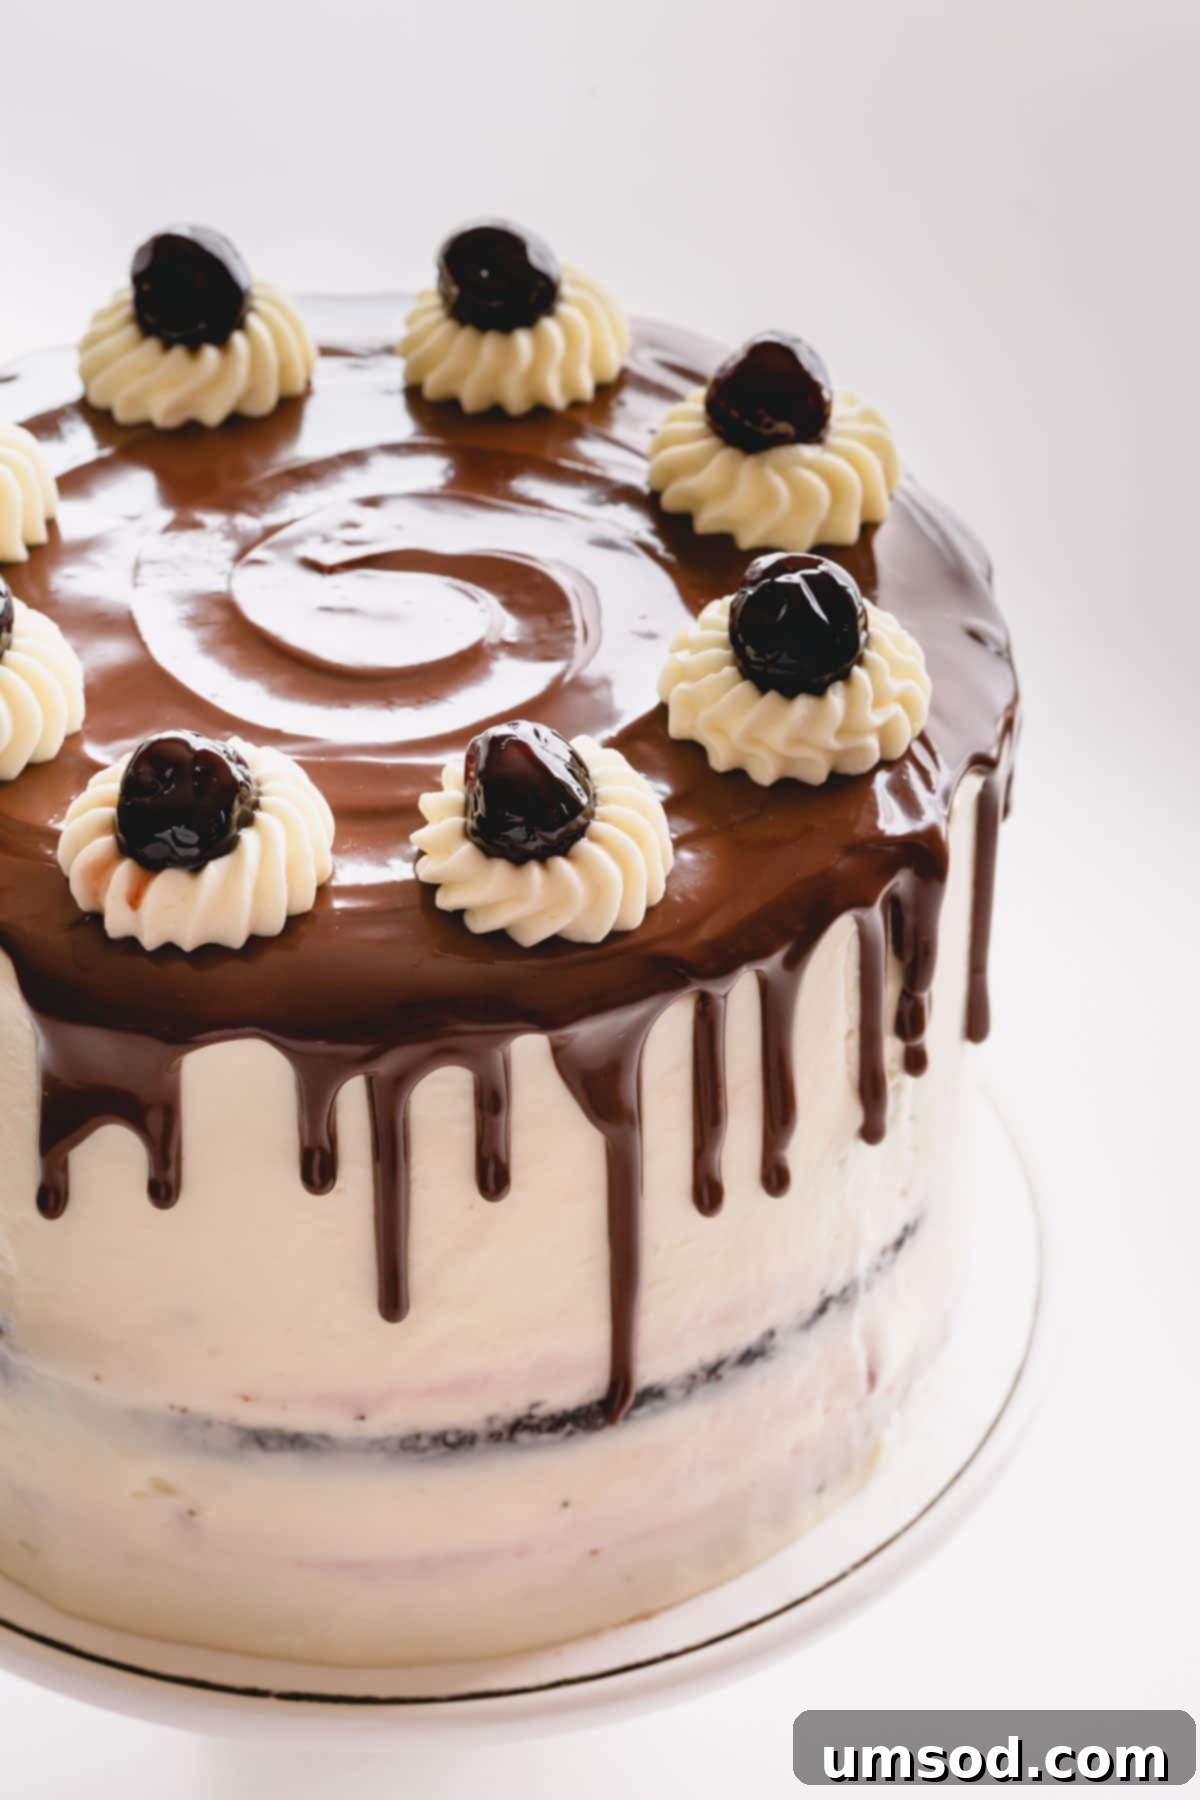
- Drip and Cover with Ganache: Carefully drip the chocolate ganache around the edges of the cake, allowing it to create elegant drips down the sides. Once the edges are done, cover the entire top surface of the cake with more ganache, spreading it evenly for a smooth finish.
- Pipe Dollops and Garnish: Pipe 8 evenly spaced dollops of mousse around the top edges of the cake. Crown each dollop with a beautifully placed canned (or fresh) cherry. For an extra touch, you can also sprinkle some chocolate shavings over the top of the cake.
Ganache Temperature Control is Crucial!
For perfect chocolate drips and coverage, your ganache needs to be just right – thick enough to hold its shape but still flowy enough to drip elegantly. Crucially, ensure it’s not hot and runny, as hot ganache will instantly melt your carefully applied frosting. Remember, ganache naturally thickens as it cools, so monitor its consistency closely.
Essential Tips for Black Forest Cake Baking Success
Achieving a truly spectacular Black Forest Cake involves a few key techniques and considerations. Heed these expert tips to ensure your baking journey is smooth and your final cake is nothing short of perfection:
- Always Chill Your Heavy Cream: This cannot be stressed enough! For your heavy cream to whip into stiff, stable peaks for the mousse, it must be thoroughly chilled. Warm cream will remain liquid and refuse to whip properly, jeopardizing the texture of your frosting.
- Master the “Spoon and Level” Flour Measurement: For accurate baking, avoid scooping flour directly from the bag. Instead, gently spoon the flour into your measuring cup until it’s overflowing, then level off the excess with the back of a knife. Better yet, for ultimate precision, weigh your flour using a kitchen scale.
- Prevent Overmixing Cake Batter: Overmixing develops the gluten in the flour excessively, leading to a dense, tough, and often gummy cake. Mix your cake batter just until the ingredients are combined and smooth, then stop. A light, fluffy cake is the goal!
- Ensure White Chocolate Mixture is Cool: When incorporating the melted white chocolate mixture into the whipped cream for the mousse, it must be completely cool to the touch. If it’s even slightly warm, it will instantly melt the delicate whipped cream, leaving you with a runny mixture instead of a stable mousse.
- Never Frost a Warm Cake: This is a golden rule in cake decorating. A warm cake will transfer its heat to the frosting, causing it to melt, slide, and create a messy finish. Always ensure your cake layers are completely cooled, and preferably chilled, before frosting.
- Chilled Cakes are Easier to Handle: For effortless slicing and stacking, work with chilled cake layers. Cold cake is much firmer and less prone to breaking or tearing, allowing for cleaner cuts and more stable layers.
- Gentle Microwave for Stubborn White Chocolate: If your white chocolate mixture doesn’t melt entirely after stirring, microwave it in very short bursts (10 to 15 seconds at a time) and stir thoroughly after each burst until it becomes completely smooth. Avoid overheating.
- For an Authentic Boozy Kick: To impart the traditional Schwarzwälder Kirschtorte flavor, consider adding a tablespoon or two of kirsch (cherry brandy) or a cherry liqueur to the reserved cherry syrup before you brush it onto the cake layers. This adds a wonderful depth of flavor.
Smart Make-Ahead Strategies for Effortless Baking
Preparing a multi-component cake like the Black Forest Cake can feel daunting, but breaking it down with smart make-ahead tips can make the process much more enjoyable and stress-free:
- Chocolate Cake Layers are Your Friend: The chocolate cake layers are perfect candidates for make-ahead preparation! As mentioned, they are actually easier to slice when chilled, which also reduces crumbling.
- Storage for Cake Layers: Once your cake layers have completely cooled, wrap each one tightly in plastic wrap to prevent them from drying out. They can be refrigerated for up to 2 days or frozen for up to 3 months. If freezing, thaw them in the refrigerator overnight before use.
- Prepare Cherry Sauce in Advance: The homemade cherry sauce can also be made up to 2 days ahead of time. After it cools completely, transfer it to an airtight container and refrigerate until you’re ready to assemble the cake. Chilling allows it to thicken to the perfect consistency.
- Mousse Frosting is Best Fresh: This is the one component you should NOT make significantly in advance. The gelatin in the white chocolate mousse frosting will continue to set in the refrigerator, making it very firm and difficult to pipe and spread smoothly. Prepare it just before assembling your cake for the best results.
Storing Your Delicious Black Forest Cake
To preserve the freshness and exquisite taste of your Black Forest Cherry Cake, proper storage is essential. Due to its dairy-based mousse frosting and fresh cherry filling, this cake requires refrigeration.
Store any leftover cake in the refrigerator. Gently wrap the cake (or individual slices) in plastic wrap to prevent it from absorbing refrigerator odors and to keep it from drying out. When stored correctly, your Black Forest Cake will remain delicious for up to 3 days. For the best flavor and texture, allow slices to come to room temperature for about 15-20 minutes before serving.
Frequently Asked Questions About Black Forest Cake
The primary difference lies in the specific components and traditional preparation. While both feature chocolate cake, Black Forest Cake (Schwarzwälder Kirschtorte) is distinctively characterized by its multiple layers of chocolate sponge cake (often brushed with Kirschwasser), a rich cherry filling, and whipped cream as the frosting. It’s typically garnished with maraschino cherries and chocolate shavings. A “regular” chocolate cake, on the other hand, can come in many forms and often features a chocolate buttercream or ganache frosting without the specific cherry and Kirschwasser elements that define its Black Forest counterpart.
The traditional alcohol used in authentic Black Forest Cake is Kirschwasser, often simply called Kirsch. It’s a clear, colorless brandy distilled from the fermented juice of morello cherries. Unlike many other cherry liqueurs, Kirschwasser is dry, not sweet, and has a strong, distinct cherry aroma that complements the cake without making it overly sugary. While traditional, it can be omitted or replaced with non-alcoholic cherry syrup for those who prefer an alcohol-free version.
Absolutely! While Kirschwasser is traditional, you can easily make a delicious alcohol-free Black Forest Cake. Instead of Kirsch, simply use the reserved cherry syrup from canned cherries, or a non-alcoholic cherry juice, to brush over the cake layers. The rich chocolate and fresh cherry flavors will still shine through, making for a delightful dessert suitable for all.
Explore More Beautiful Layer Cake Recipes
If you’ve enjoyed mastering the art of the Black Forest Cake, you’re in for a treat! Discover more stunning and delicious layer cake recipes that are perfect for any celebration or just to satisfy your sweet tooth:
- Super Tall Red Velvet Layer Cake
- Zesty Lemon Layer Cake with Lemon Curd
- Irresistible Tiramisu Layer Cake
- Tropical Pineapple Layer Cake
- Delicate Raspberry Layer Cake with Cream Cheese Frosting
Watch Our Black Forest Cake Video Tutorial
Black Forest Cake
This upgraded Black Forest cake combines incredibly moist chocolate cake, a luscious homemade cherry sauce, and a light white chocolate mousse frosting. It’s a showstopping dessert that’s perfectly sweet and wonderfully decadent.
Comment
Print Recipe
Ingredients
For the Moist Chocolate Cake:
- 2 cups (250g) all-purpose flour
- 1 ½ cups (300g) granulated sugar
- ½ cup (60g) unsweetened cocoa powder (Note 1)
- 1 teaspoon baking soda
- 1 teaspoon instant espresso powder (Note 2)
- ½ teaspoon salt
- 1 cup + 2 tablespoons (280ml) milk, at room temperature (Note 3)
- 2 large eggs, at room temperature
- ¼ cup (60ml) vegetable oil
- 4 tablespoons (56g) unsalted butter, melted
- 1 teaspoon white vinegar or apple cider vinegar
For the Sweet Cherry Sauce:
- 4 cups pitted sweet cherries (fresh or frozen)
- ½ cup sugar
- 4 tablespoons cornstarch
- ⅛ teaspoon salt
- ½ teaspoon pure vanilla extract
- 1 tablespoon fresh lemon juice
For the White Chocolate Mousse Frosting:
- 1 ½ teaspoons (6g) powdered gelatin
- 2 tablespoons water
- 18 ounces (500g) white chocolate chips
- 3 cups (720 ml) heavy whipping cream, chilled
For Cake Assembly:
- 1 can (15oz) dark sweet cherries in heavy syrup
For the Rich Chocolate Ganache:
- ¼ cup (2oz/60ml) heavy cream
- 2 ounces bittersweet chocolate, chopped
Equipment
- Two 7-inch cake pans
- Stand mixer with paddle & whisk attachment (or hand mixer)
- Wire rack
- Saucepan
- Mixing bowls
- Measuring cups & spoons
- Piping bags with round and star tips
- Pastry brush
- Offset spatula or bench scraper
Instructions
To Make the Chocolate Cake:
- Line two 7-inch cake pans with parchment paper and lightly spray with cooking spray.
- Preheat your oven to 350°F (175°C).
- In a large mixing bowl (or stand mixer with paddle attachment), combine the flour, sugar, cocoa powder, baking soda, and salt. Mix on low speed for about 30 seconds, or until all dry ingredients are thoroughly combined.
- Add the milk, eggs, vegetable oil, and melted butter to the dry ingredients. Mix the batter just until it is smooth, being careful not to overmix, usually about 15 seconds.
- Stir in the white vinegar and mix for another 10 seconds.
- Divide the prepared batter evenly between the two lined baking pans. Bake for 35 minutes, or until a toothpick inserted into the center of the cakes comes out clean.
- Allow the cakes to cool completely in their pans on a wire rack. Once cool, carefully run a knife around the edges of each pan and invert the cakes.
- For best results, wrap each cooled cake in plastic wrap and refrigerate until ready to use, preferably overnight and up to 2 days. Chilled cakes are significantly sturdier and much easier to slice and handle, though you can frost them as soon as they’ve cooled completely.
To Make the Cherry Sauce:
- In a medium saucepan, bring the pitted sweet cherries to a boil over medium-high heat.
- In a small separate bowl, whisk together the sugar, cornstarch, and salt until well combined.
- Add this sugar-cornstarch mixture to the boiling cherries, along with the vanilla extract and fresh lemon juice. Reduce the heat to medium-low and continue to cook the mixture, stirring constantly with a wooden spoon, for about 5 minutes, or until the sauce visibly thickens.
- Remove the saucepan from the heat and allow the cherry sauce to cool completely. For best results, chill the sauce in the refrigerator for several hours or overnight until firm.
To Make the White Chocolate Mousse Frosting:
- In a small cup, sprinkle the powdered gelatin evenly over the cold water. Let it stand for 5 minutes to “bloom” or soften.
- In a small saucepan, pour 1 cup of heavy cream and bring it to a gentle simmer over low heat. Do not let it boil. Remove from heat and add the bloomed gelatin mixture. Stir continuously until the gelatin is fully dissolved.
- In a medium bowl, pour the warm gelatin-cream mixture over the white chocolate chips. Using a silicone spatula, mix until the white chocolate is completely melted and the mixture is smooth. Let this white chocolate ganache cool to room temperature. This step is crucial; ensure it is not warm when mixing with whipped cream.
- In a large mixing bowl with a whisk attachment (or using a hand mixer), whip the remaining 2 cups of heavy cream until firm, stiff peaks form.
- Gently fold the cooled white chocolate ganache into the whipped cream until well combined and uniform. (TIP: Double-check that the white chocolate ganache is not warm, otherwise it will melt the whipped cream, resulting in a runny frosting.)
To Assemble the Cake:
- Once the cake layers are completely cooled (and ideally chilled), carefully slice each cake horizontally into two equal layers, creating a total of four layers.
- Divide the white chocolate mousse frosting into 2 large piping bags. You can fit them with plain round tips or simply cut the ends off the bags.
- Strain the canned dark sweet cherries, reserving the cherry syrup in a small bowl. These cherries will be used for decoration.
- Place a cake board on a turntable (if using) and smear a small amount of frosting in the middle to anchor the cake.
- Place the first layer of chocolate cake onto the anchored cake board. Using a pastry brush, evenly brush the reserved cherry syrup generously over the cake layer.
- Pipe a generous amount of mousse filling all over the cake layer. Using a small offset spatula, spread the mousse evenly across the surface. Then, pipe a border of frosting around the very edge of the cake layer to create a dam.
- Spread approximately one-third of the homemade cherry sauce (or store-bought filling) in the middle of the mousse border. Top this with a little more mousse frosting, spreading gently to level the layer for the next cake.
- Place the next cake layer on top and repeat steps 5-7 until all four cake layers are assembled.
- To crumb coat the cake: Apply a thin layer of the remaining mousse frosting to the entire outside surface of the assembled cake. Smooth it out as best as you can to trap any loose crumbs. For added stability, wrap the cake with plastic wrap and place a metal cake collar around the base, if available. Refrigerate the cake for 30-60 minutes to allow the crumb coat to set and stabilize the cake.
To Make Chocolate Ganache (for decoration):
- Heat the heavy cream in a microwave-safe bowl for about 45 seconds, or until it is hot but not boiling.
- Place the finely chopped bittersweet chocolate in a separate bowl. Pour the hot cream over the chocolate. Let it sit undisturbed for 2 minutes to allow the chocolate to melt, then stir until completely smooth.
- If the chocolate isn’t fully melted, microwave the mixture in 15-second intervals, stirring after each, until the ganache is smooth and flowing. (TIP: Prepare the ganache right before you plan to decorate the cake, ensuring it’s the right consistency.)
To Decorate the Cake:
- Remove the chilled, crumb-coated cake from the refrigerator. Apply another layer of the white chocolate mousse frosting to the entire cake, smoothing it out nicely with an offset spatula or a bench scraper for a polished finish.
- Transfer the prepared chocolate ganache into a squirt bottle or a small piping bag with a very small opening. Ensure the ganache is flowing but not too hot before decorating, as hot ganache will melt the frosting. The ganache will thicken as it cools.
- Transfer a small amount of the remaining mousse frosting into a piping bag fitted with a star tip for decorative dollops.
- Carefully drip chocolate ganache around the edges of the cake, allowing it to create elegant drips down the sides. Then, cover the entire top surface of the cake with more ganache, spreading it evenly.
- Pipe 8 beautiful dollops of mousse frosting with the star tip evenly spaced around the top edge of the cake. Garnish each dollop with a strained canned cherry. For an extra flourish, you can sprinkle chocolate shavings over the top.
⭐️ Did you make this recipe?
Please leave a review and let us know how you liked it!
Video
Tips & Notes
Storing Tips: Store leftover Black Forest Cake in the refrigerator, gently wrapped in plastic wrap, for up to 3 days. Allow to come to room temperature for 15-20 minutes before serving for optimal texture.
Note 1: You can use either unsweetened natural or Dutch-processed cocoa powder in this chocolate cake recipe. Both will yield a rich chocolate flavor, though Dutch-processed will result in a darker color and slightly milder chocolate taste.
Note 2: Instant espresso powder is a secret ingredient that doesn’t add a coffee flavor; you won’t taste it in the final cake. Instead, it significantly enhances and deepens the natural chocolate flavor. If you don’t have it, you can simply omit it without compromising the cake’s overall success.
Note 3: For the richest and most tender chocolate cake, I highly recommend using whole milk. However, 2% milk, skim milk, or even a non-dairy alternative like almond milk will also work successfully.
Note 4: As a convenient alternative to making homemade cherry sauce, you may use one (21oz) can of good quality store-bought cherry pie filling. Ensure it’s well-chilled before use.
Nutrition
Did you make this?
Leave a rating and your feedback. Thank you!
