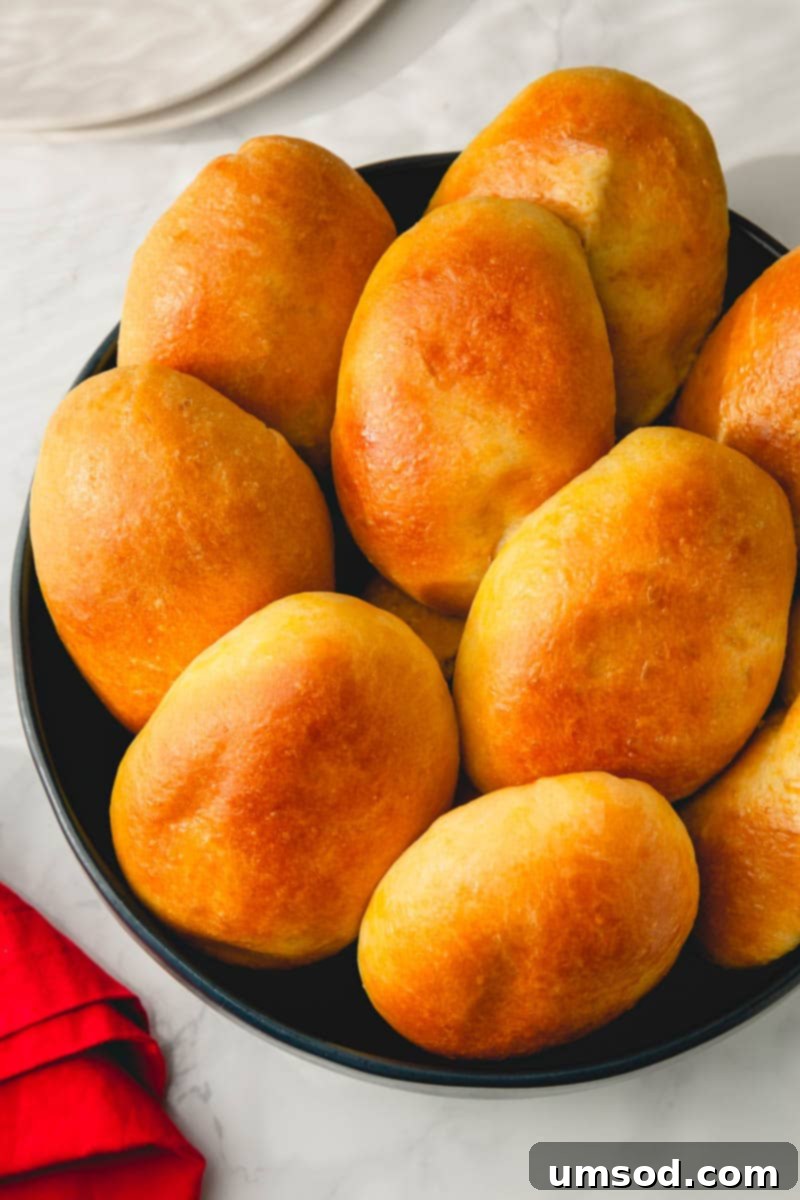
Delight in the comforting warmth of these pillowy soft Russian Pirozhki. These irresistible hand pies are crafted from an easy-to-make yeast dough and generously stuffed with a savory filling of leftover mashed potatoes and seasoned ground beef, then baked to golden perfection. They are a true taste of home, perfect for a hearty snack, a light lunch, or a delightful addition to any meal.
If you’re a fan of traditional Russian cuisine, you might also enjoy my classic fried Pirozhki recipe, which offers an equally amazing experience with a different texture profile.
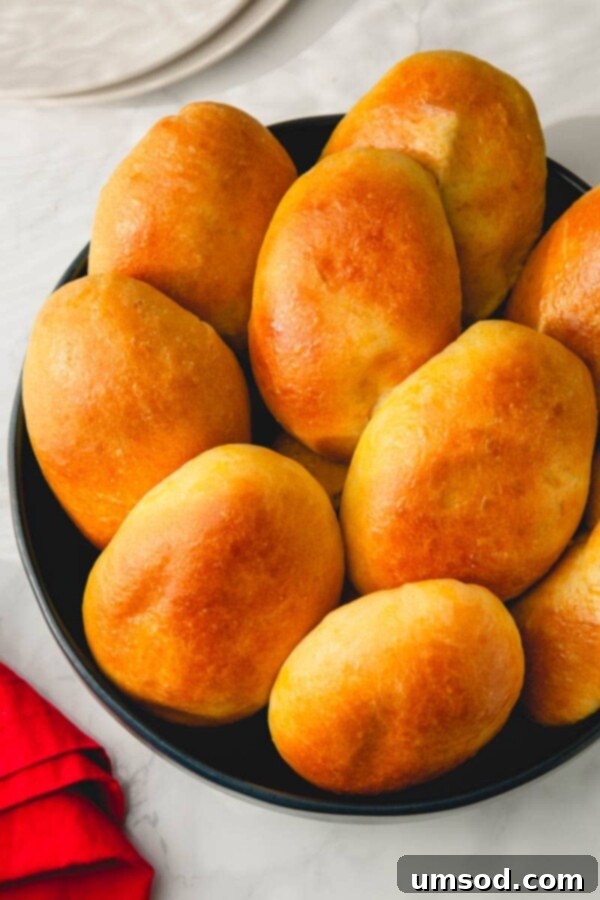
What are Pirozhki? A Culinary Journey into Russian Hand Pies
Pirozhki (pronounced pee-roh-SHKEE, plural form of pirozhok) are a beloved staple in Russian and Eastern European cuisine. These enchanting hand pies are essentially small baked or fried buns made from a rich, yeasted dough, filled with an incredible variety of sweet or savory ingredients. While the spelling can vary (pirozhki, piroshki, pirojki), their deliciousness remains universally recognized. They represent comfort food at its finest, often enjoyed as a snack, an appetizer, or even a light meal.
Historically, pirozhki have been a popular item at family gatherings, festive occasions, and local bakeries. They embody the heartwarming tradition of home-cooked meals, bringing smiles with every bite. The versatility of pirozhki is truly remarkable; you can find them filled with anything from meat, potatoes, and cabbage to sweet fruits and jams. Today, we’re focusing on a baked version that highlights a perfectly soft and fluffy dough, specifically formulated to achieve that delightful, melt-in-your-mouth texture when baked rather than fried. While both baked and fried versions are equally delicious, a slightly richer dough with a bit more fat is often preferred for baked pirozhki to ensure they remain tender and not dry.
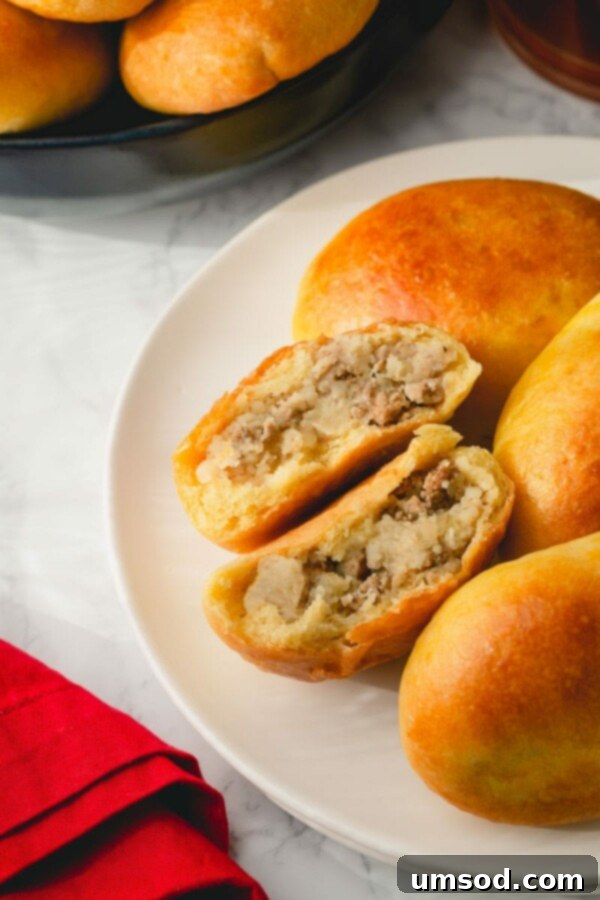
Crafting Homemade Baked Pirozhki: A Step-by-Step Guide
Making pirozhki from scratch is a rewarding experience, and this recipe is designed to be accessible even for beginner bakers. The key to exceptional pirozhki lies in a tender, flavorful dough and a well-balanced filling. Let’s break down the process into easy, manageable steps.
The Foundation: Perfecting Your Yeast Dough
This yeast dough is incredibly forgiving and yields consistently soft results. While a KitchenAid stand mixer makes the process effortless, it can certainly be mixed by hand with a little elbow grease.
For best results, I highly recommend Red Star Platinum yeast. While this isn’t a sponsored endorsement, it’s genuinely my go-to yeast due to its reliability and consistent activation, eliminating the need for separate proofing. Its active nature helps ensure a beautifully light and airy texture every time.
Pro Tip for Yeast
With high-quality instant yeast like Red Star Platinum, you can typically skip the proofing step. Simply combine it directly with your dry ingredients, saving time and ensuring successful activation.
Dough Preparation Steps:
- Combine Dry Ingredients: In a large mixing bowl (or the bowl of your stand mixer fitted with a dough hook), thoroughly combine the all-purpose flour, granulated sugar, instant dry yeast, and coarse kosher salt. Mix well to ensure an even distribution of the yeast and salt.
- Whisk Wet Ingredients: In a separate small bowl, whisk together the sour cream, large eggs, and milk until the mixture is smooth and well-incorporated. Ensure all wet ingredients are at room temperature for optimal yeast activation and dough consistency.
- Combine Wet and Dry: Gradually add the wet ingredient mixture into the dry ingredients. Begin mixing on low speed (if using a stand mixer) or with a wooden spoon. As the dough comes together, it will start to form a smooth, cohesive ball. You may not need all of the milk; add it incrementally until the dough is smooth, elastic, and slightly tacky, but not overly sticky. Humidity and flour type can influence the exact liquid amount needed.
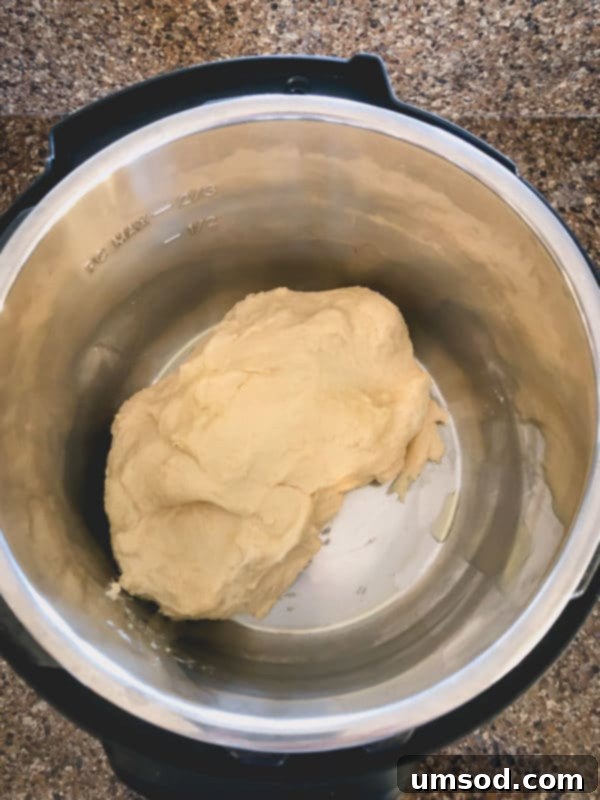
- First Rise (Proofing): Once the dough is smooth, lightly oil a clean bowl and place the dough inside. Turn the dough once to coat it lightly with oil. Cover the bowl with a damp kitchen towel or plastic wrap and place it in a warm, draft-free spot. Let the dough rise for 1-2 hours, or until it has at least doubled in size. A warm environment is crucial for proper yeast activation and a fluffy dough.
Quick Proofing with an Instant Pot
For an accelerated proofing process, your Instant Pot can be a game-changer:
- Set your Instant Pot to the “Yogurt” setting, which provides a consistently warm environment.
- Drizzle a small amount of olive oil in the bottom of the Instant Pot insert.
- Place the prepared dough inside and cover the pot with any glass lid or a plate (not the pressure cooker lid).
- Allow the dough to rise until doubled in size, which typically takes only about 30 minutes in the Instant Pot.
Hearty Mashed Potatoes and Beef Filling
This recipe is excellent for repurposing leftover mashed potatoes, making it a delicious and economical meal. However, you can also prepare fresh mashed potatoes specifically for this recipe. Beyond this classic, feel free to explore other savory fillings like cooked rice, stewed cabbage, or sautéed mushrooms. The possibilities are truly endless!
Filling Preparation Steps:
- Brown the Beef and Aromatics: In a large skillet or Dutch oven, heat 1 tablespoon of olive oil over medium-high heat. Add 1 lb of lean ground beef, chopped onion, and 1-3 pressed garlic cloves (adjust to your preference). Season with 1 teaspoon of coarse kosher salt and your favorite seasonings (such as black pepper, paprika, or a pinch of dill). Cook the meat, breaking it apart with a wooden spoon, until it’s thoroughly browned and no longer pink.
- Cool the Meat: Transfer the cooked beef mixture to a large bowl and allow it to cool completely. This is a crucial step to prevent the heat from affecting the dough during assembly.
- Combine with Mashed Potatoes: Once the beef mixture is cool, add 1 cup of mashed potatoes to the bowl. Mix everything together thoroughly until the meat and potatoes are well combined. Taste the filling and adjust the seasoning with additional salt and pepper as needed.
Assembling Your Delicious Pirozhki
Once your dough has risen and your filling is ready, it’s time to bring these delightful hand pies to life.
Assembly and Baking Steps:
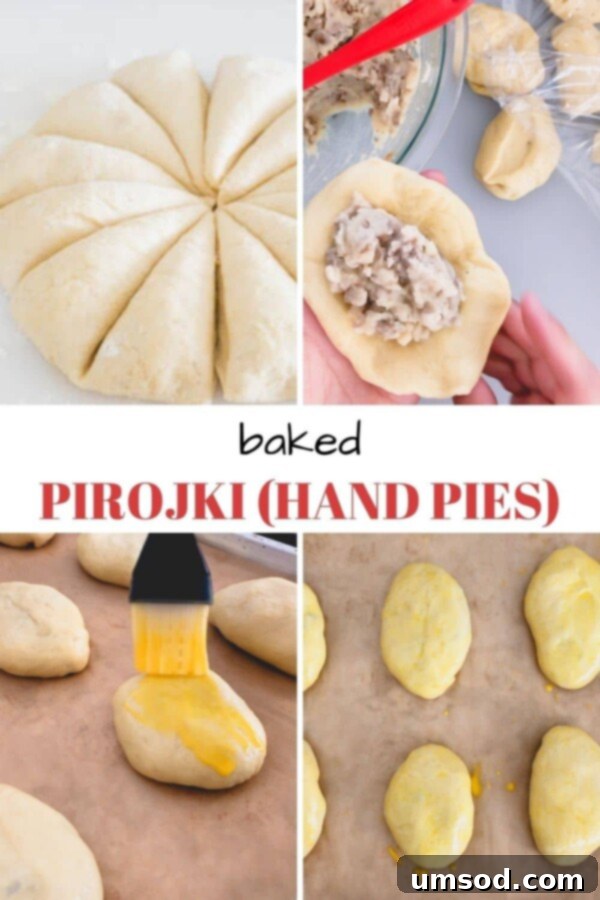
- Divide the Dough: Gently turn the proofed dough onto a lightly oiled counter. Form it into a smooth dough ball. To ensure even-sized pirozhki, divide the dough into 12 equal parts. You can achieve this by gently flattening the dough into a disk and cutting it like a pizza. Roll each portion into a smooth ball.
- Fill and Seal: Take one dough ball and gently flatten it with your hands or a rolling pin into a small disc, about 4-5 inches in diameter. Place a generous spoonful of the cooled filling in the center of the dough disc. Fold the dough over the filling to create a half-moon shape. Pinch the edges tightly to seal the pirozhki, ensuring no filling leaks out during baking. For a classic look, you can crimp the edges with a fork.
- Arrange and Prepare for Baking: Carefully arrange the assembled hand pies, seam side down, on a baking sheet lined with parchment paper. Leave some space between each pirozhok to allow for expansion during baking.
- Egg Wash and Bake: In a small bowl, whisk one egg yolk with 1 tablespoon of water to create an egg wash. Lightly brush the egg wash over the tops and sides of each pirozhok. This will give them a beautiful golden-brown color and a lovely shine.
- Bake: Preheat your oven to 350°F (175°C). Bake the pirozhki for approximately 20-25 minutes, or until they are puffed up and turn a beautiful golden-brown. Keep an eye on them to prevent over-browning.
- Serve: Once baked, remove the pirozhki from the oven and let them cool slightly on the baking sheet before serving. They are best enjoyed warm or at room temperature.
Dough Dividing Tip
The easiest way to divide the dough into equal parts is to gently flatten it into a thick disc and cut it like you would a pizza, into 12 wedges. Don’t worry about them being perfectly identical; rustic charm is part of homemade pirozhki!
Unleashing Your Creativity: What Fillings Can You Use in Pirozhki?
One of the most exciting aspects of making pirozhki is the sheer endless array of filling options. The beauty of this versatile yeast dough is that it pairs wonderfully with both sweet and savory fillings, making it adaptable to any craving or occasion. While today we’re focusing on the comforting mashed potato and ground beef filling, don’t hesitate to experiment and discover your own favorites.
Beyond Beef & Potatoes: More Savory Filling Ideas
These savory fillings offer a delightful contrast to the slightly sweet, rich dough:
- Stewed Cabbage: A classic choice, often prepared by sautéing shredded cabbage with carrots, onions, and sometimes a touch of tomato paste or dill until tender.
- Rice and Meat: Cooked rice mixed with seasoned ground beef, chicken, or pork, often enhanced with fresh herbs like parsley or dill.
- Cheesy Mashed Potatoes: Elevate your mashed potatoes by incorporating grated cheddar, mozzarella, or a blend of your favorite cheeses for extra creaminess and flavor.
- Mushroom and Onion: Sautéed mushrooms (button, cremini, or wild) with finely chopped onions, seasoned with salt, pepper, and a touch of sour cream for richness.
- Hard-boiled Eggs with Green Onions: A simple yet flavorful combination of chopped hard-boiled eggs mixed with fresh green onions and a dollop of mayonnaise or sour cream.
- Any Kind of Meat: Ground chicken, turkey, or pork can be seasoned similarly to beef, perhaps with different spices like cumin for turkey or sage for pork, offering diverse flavor profiles.
Sweet Sensations: Indulgent Sweet Filling Ideas
For those with a sweet tooth, pirozhki can transform into a delightful dessert or breakfast treat:
- Apple Pie Filling: Use homemade or canned apple pie filling, enhanced with a sprinkle of cinnamon and nutmeg.
- Fresh Berries: Blueberries, raspberries, or sliced strawberries can be mixed with a little sugar and a touch of cornstarch to thicken their juices during baking.
- Any Jams or Preserves: Your favorite fruit jams, like apricot, cherry, or plum, make for a quick and easy sweet filling.
- Farmer’s Cheese (Tvorog): A traditional sweet filling made with farmer’s cheese mixed with sugar, a beaten egg yolk, and sometimes raisins or vanilla extract.

Storing and Reheating Your Delicious Pirozhki
These delightful hand pies are fantastic for meal prepping or making ahead, allowing you to enjoy them throughout the week or save them for a future craving. Proper storage and reheating ensure they remain as delicious as when they were freshly baked.
Reheating for Optimal Enjoyment
Whether you’re warming up one for a quick snack or several for a meal, reheating pirozhki is simple:
- Microwave: For a quick reheat, place 1-2 pirozhki on a microwave-safe plate. Cover them with a damp paper towel to prevent drying out and microwave for 30 seconds. If needed, continue microwaving in 15-second intervals until warmed through.
- Oven: To restore some of their crispiness, preheat your oven to 300°F (150°C). Place pirozhki on a baking sheet and heat for 10-15 minutes, or until warmed through. This method is especially good if reheating multiple pirozhki.
Reheating Pirozhki Tip
Always cover pirozhki when microwaving. This retains moisture, preventing them from drying out and becoming rubbery. A damp paper towel works wonders!
Can I Freeze Pirozhki?
Absolutely! These little hand pies freeze beautifully, making them an ideal candidate for batch cooking and convenient future meals. They retain their flavor and texture remarkably well.
To Freeze: Allow the baked pirozhki to cool completely. Once cooled, arrange them in a single layer on a baking sheet and freeze for 1-2 hours until solid. This prevents them from sticking together. Once frozen, transfer the pirozhki to a freezer-safe bag or an airtight container. They can be stored in the freezer for up to 3 months.
To Reheat from Frozen: No need to thaw! Simply follow the reheating directions for the microwave or oven, but increase the heating time. For the microwave, start with 1-1.5 minutes and add more time as needed. For the oven, bake at 325°F (160°C) for 15-25 minutes, or until heated through.


Baked Pirozhki: Savory Mashed Potato and Beef Hand Pies
Comment
Print Recipe
Ingredients
For the Dough:
- 4 cups (500 g) all-purpose flour
- 1 tablespoon granulated sugar
- 1 packet instant dry yeast (Note 1)
- ½ teaspoon coarse kosher salt
- ½ cup (120 g) sour cream, at room temperature
- 2 large eggs, at room temperature
- 2/3 cup (160 ml) milk, at room temperature
For the Filling:
- 1 tablespoon olive oil
- 1 lb (450 g) lean ground beef
- 1-3 garlic cloves, pressed (adjust to taste)
- 1 teaspoon coarse kosher salt
- ½ onion, chopped
- 1 cup mashed potatoes (preferably leftover)
Instructions
To Make the Dough:
- In a large mixing bowl with a dough hook attachment (or a large bowl if mixing by hand), combine flour, sugar, yeast, and salt. Mix thoroughly to combine dry ingredients.
- In a small bowl, whisk together sour cream and eggs until smooth.
- Add the sour cream mixture and half of the milk into the flour mixture.
- Mix the dough until it starts to come together into a smooth ball. Gradually add the remaining milk, a little at a time, as you may not need all of it. The exact amount of liquid can vary depending on humidity and flour type. Continue mixing until the dough is smooth, elastic, and pulls away from the sides of the bowl.
- Lightly coat the dough with a small amount of vegetable oil and place it back in the bowl. Cover the bowl with a damp kitchen towel or plastic wrap and place it in a warm, draft-free spot to rise for about 1-2 hours, or until doubled in size. (For faster proofing, you can use an Instant Pot on the Yogurt setting for about 30 minutes, or place the bowl in a microwave with a glass of hot water—do not turn on the microwave, it acts as an insulated box.)
To Prepare the Filling:
- Meanwhile, prepare the filling. Heat olive oil in a large skillet or Dutch oven over medium-high heat.
- Add the ground beef, chopped onion, pressed garlic, and salt. Cook the meat, breaking it apart with a wooden spoon, until it is thoroughly cooked through and browned. Transfer the cooked meat mixture into a large bowl and allow it to cool completely. Once cooled, mix it well with the mashed potatoes.
To Assemble and Bake the Hand Pies:
- Preheat your oven to 350°F (175°C). Line a large baking sheet with parchment paper.
- Once the dough has doubled in size, gently turn it out onto a lightly oiled or floured surface. Knead it briefly (1-2 minutes) to form a smooth ball. Lightly flatten the dough ball into a disk, then divide it into 12 equal parts (e.g., by cutting it like a pizza). Roll each piece into a smooth ball.
- Take one dough ball and flatten it with your hands or a rolling pin into a small disc (about 4-5 inches in diameter). Place a generous spoonful of the cooled filling in the center. Fold the dough over the filling to create a half-moon shape. Pinch the edges of the dough tightly to seal, ensuring no gaps. Gently flatten the hand pie slightly between your palms, making sure the sealed crimps are on the flat side. (Refer to the photos above for visual guidance.)
- Arrange the shaped hand pies on the prepared baking sheet, leaving some space between each one.
- In a small bowl, beat 1 egg yolk with 1 tablespoon of water until smooth to create an egg wash. Brush the egg wash evenly over the tops and sides of all the hand pies.
- Bake the pirozhki for 20-25 minutes, or until they are beautifully golden brown and puffed up.
- Serve them warm or at room temperature. Enjoy your homemade Russian Pirozhki!
⭐️ Did you make this recipe?
Please leave a review and let us know how you liked it!
Tips & Notes
Nutrition Information (Estimated per serving)

